First of all, I have to apologise. It’s been literally two months since my last post in this series, and it’s been more than that since I last looked at Ajax in PHP. OK, I might admit it, it was this comment that motivated me to pick up this series again. Oh, that and I’m now on the half term break, so I’m finally getting round to some things that have been on the back burner for a long time.
In our last Ajax tutorial, we got started with Ajax using PHP and made our first Ajax application.
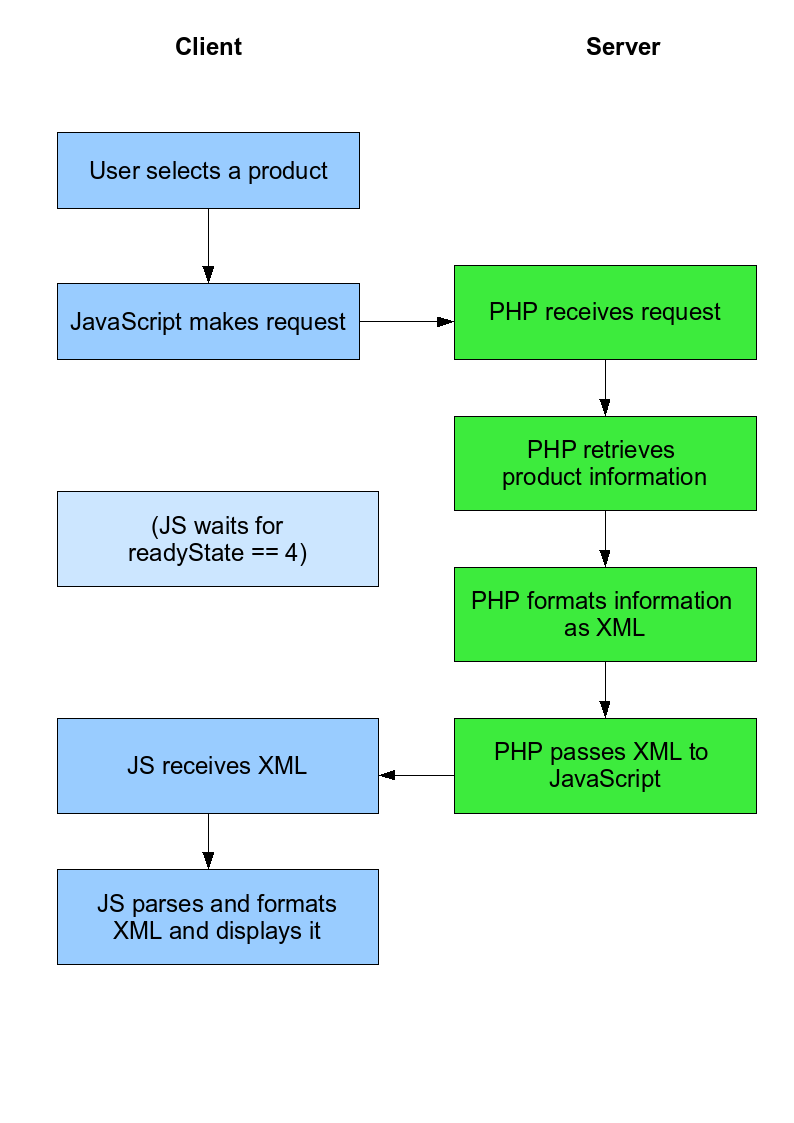
Today, we’re going to take Ajax a little further, by building a little application where our user selects a product from a pop-up list, and then we do a little Ajax dance to get some product details (and an image) and display them in a box below. We’ll be making our own little XML schema which we’ll use to pass information between the JavaScript in the user’s browser and our PHP script on the server.
Requirements
For this tutorial, you’ll need the following (and in brackets, I’ll show you what I’ll be using):
A web server running PHP (I’m using PHP 5, but it might work on PHP 4).
A decent browser (I’ll be using Firefox 2.0.0.1).
A decent text editor and/or IDE that supports Unix line breaks if you download my set of files (I’m using the best web development IDE in the world, Quanta).
Some patience, time, determination and enough hair to rip out when the JavaScript is going wrong (check, check, check).
Also highly recommended, but not required, is the Firebug extension for Firefox, as it makes checking and debugging your JavaScript a lot easier.
All code in this tutorial is released under the Modified BSD Licence.
You might want to download yourself the finished project now, so you can see how it works and if you’re not rewriting it yourself and just stepping through my code.
Diagrams are always good, so let’s briefly look at what we’ll be doing (click to enlarge, or grab the PDF).
That’s roughly how our system is going to work.
Our list of products that will appear in the <select> list will be populated by PHP on the pageload and for this tutorial, the product data that we’ll be using will be hard-coded into PHP. There’s no reason why you couldn’t populate the list and fetch product details using a database, but to keep it simple, we’ll stick with a set list for this tutorial. We will write it so that it’s easily modifiable, though.
Please support this work!
There used to be advertising here, but I no longer feel sure that advertising delivers the best experience and truly reflects the values of this site.
Keeping things running, however, is not without financial cost. If you would like to support the time and effort I have put into my tutorials and writing, please
consider making a donation.
Our data
Here’s data.php, which contains our product information.
[php][/php]
OK, fairly simple. From now on, we need to make sure all our PHP files include() or require() this data file.
Our interface
Here’s index.php, our main interface with the user.
[php]
Product information page
Product information page
Welcome. Please buy lots of stuff from this website. To find out more about a product, choose it from
the box below.
$prod) {
?>
[/php]
The Ajax backend
Here’s our PHP file that will act as our backend. It’s the script JavaScript calls behind the scenes to get the data. As you can see, we have our own XML setup going on below, which I’ll explain in a minute.
productresponse is the root tag, and is only really used here as a container.
requeststatus lets JavaScript know whether the request was OK, or failed, identified by ERROR or OK. (If there is an error, that’s it – the end of the XML document. We won’t bother including the tags below).
productname contains the product name (funnily enough).
productdesc contains the product description.
productprice is for the price.
If you’ve got all the files in place so far, try browsing to ajax.php. If you’re using a decent browser, you should get a nice syntax-highlighted XML tree (nice for debugging). You’ll notice that you’ve got an error here, and rightly so – you didn’t specify a product ID!
Try going to ajax.php?prodid=1. That’s better. You should see the data in ourtags. That’s our fully formed XML document that JavaScript will have the job of parsing and formatting. Sounds like fun…
The JavaScript
Now, finally, the hardest part of the whole exercise – the JavaScript that actually makes sense of the XML and displays it in our box. Bear with me here, let’s just get the code down here then I’ll explain what we’re doing.
[js]var ajaxObject = false;
// this is our object which gives us access
// to Ajax functionality
function selectProduct(productId) {
if (window.XMLHttpRequest) { // Gecko, KHTML/WebKit, and IE7 apparently
ajaxObject = new XMLHttpRequest();
if (ajaxObject.overrideMimeType) {
ajaxObject.overrideMimeType(‘text/xml’);
// ^ is for older Mozilla-based browsers
}
} else if (window.ActiveXObject) { // IE5 or IE6
try {
// IE has two methods of calling the object, typical!
ajaxObject = new ActiveXObject(“Msxml2.XMLHTTP”);
} catch (e) {
try {
ajaxObject = new ActiveXObject(“Microsoft.XMLHTTP”);
} catch (e) {}
}
}
if (!ajaxObject) {
alert(“Sorry, your browser doesn’t support this feature.”);
return false;
}
if (ajaxObject.readyState == 4) { // it’s finished
if (ajaxObject.status == 200) { // the HTML request is all OK
// do the response
var xmlData = ajaxObject.responseXML.documentElement;
if (xmlData.getElementsByTagName(“requeststatus”)[0].firstChild.data != ‘OK’) {
// if isn’t OK, then stop processing
alert(“Sorry, there was an error.”);
return;x
}
var productName = xmlData.getElementsByTagName(“productname”)[0].firstChild.data;
// extract product name from the XML
var productDesc = xmlData.getElementsByTagName(“productdesc”)[0].firstChild.data;
// same with product description
var productPrice = xmlData.getElementsByTagName(“productprice”)[0].firstChild.data;
// and price
// now we’ve extracted our data, let’s format it
var divContent = ‘Name: ‘ + productName + ‘
Description: ‘ + productDesc + ‘
Price ‘ + productPrice;
// and place it in our div
document.getElementById(‘descriptionarea’).innerHTML = divContent;
} // end if status is 200
else // if the HTTP code is anything other than 200 OK
{
alert(“Sorry, there was an error.”);
return;
}
} // end readyState is 4
} // end selectProduct_response
[/js]
Dissecting the JavaScript
You should be able to decipher the vast majority of this already. If you’ve been through the first tutorial (and you certainly should have), you should understand exactly what we’re doing with the basic Ajax stuff.
The new and important bit here are the lines like this:
It’s exactly the same idea, but instead of putting the content of the requeststatus tag into a variable so we can use it later, we just check to see if it isn’t ‘OK’. And if it isn’t, we throw an error dialogue box.
It works!
At this point, our example works very well. Very very well. If you head over to index.php, you should be able to simply select a product from the list and have the description pop into the correct box within a second or two.
It might not seem very impressive for the level of work – and in fact, we could have done this without XML, but now that you’ve got some basic XML parsing with JavaScript ability, you can move on to cooler things with Ajax.
I could go on and extend this application some more, but this is already a monster post and it’s about time I signed off this tutorial. We may well be returning to this project at a later date to add some more functionality to it, but I can’t guarantee when that will be.
Feedback is the key
This tutorial took an insane amount of time to write. Almost a whole afternoon. Actually, you have to plan it, write the code, then write the tutorial, debug the code, fix the code, break the code, rewrite bits of the tutorial and check everything works.
And that takes time.
All I ask of you is that if you read this and liked it, or if you didn’t, or if you just read it, to leave a comment below. It makes all the effort worthwhile.
Anyway, thanks for reading thus far and I look forward to next time!
Awesome, prior to reading this article the process of adding some ajax to my php sites was a pretty nebulous to say the least. This gives me a great jumping off point. Thanks a bunch!
Thanks a billion for this tutorial.. i have been trying learn ajax. so far i cant really understand it. But your is a simple and detail one which i can understand and now i know how to write it already.
Once again thank you for your time in writing this tutorial. 🙂
Thanks a great deal for these two tutorials! The instructions are very clear and well written, an excellent jumping point to start my training into what I can do with AJAX.
Brilliant!
I have completed both AJAX tutorials, managed to break them both, and fix them again, with thanks to what I learned here.
Now I’m off to adapt what I’ve learnt to a real-world scenario.
Many thanks.
[…] Ready to take Ajax further? I’ve got a followup tutorial. This was written by Peter. Posted on Wednesday, September 27, 2006, at 5:09 pm. Filed under […]
First of all, I have to apologise. It’s been literally two months since my last post in this series, and it’s been more than that since I last looked at Ajax in PHP. OK, I might admit it, it was this comment that motivated me to pick up this series a…
There used to be advertising here, but I no longer feel sure that advertising delivers the best experience and truly reflects the values of this site.
Keeping things running, however, is not without financial cost. If you would like to support the time and effort I have put into my tutorials and writing, please
consider making a donation.

this is one and only & very nice tutorial, which i have found in net. By this i can able to write my own ajax program.
thank u very much.
Ashok
Awesome, prior to reading this article the process of adding some ajax to my php sites was a pretty nebulous to say the least. This gives me a great jumping off point. Thanks a bunch!
Thanks for writing this, I needed something like this.
Sweet comprehensive tutorial, just what I have been looking for! Well Pleased…
Thank you so much for your time to write this tutorial. Awesome!
Fantastic content. Just the kind of stuff I need. Thanks so much.
Alan
Excellent tutorial. I check out the basic PHP/AJAX tut, and after going over it, immediately went through this one.
Your tutorials are clear and concise. Will be letting friends know about these two.
Cheers.
Thanks a billion for this tutorial.. i have been trying learn ajax. so far i cant really understand it. But your is a simple and detail one which i can understand and now i know how to write it already.
Once again thank you for your time in writing this tutorial. 🙂
awesome stuff man! you really helped me into ajax and I will not try to rewrite my blog into ajax and xml stuff!
thanks dude!
Thanks! Great tutorial!!
Thanks a great deal for these two tutorials! The instructions are very clear and well written, an excellent jumping point to start my training into what I can do with AJAX.
I look forward to reading the next installment.
like
It’s really a good start for me, thank you very much!
Thanks,
You’ve been my first introduction to Ajax!
thanks, Peter, your tutorials are a great way to share your knowledge: well written, and to the point.
I enjoyed them very much.
It runs cool…but i wanna display & update d users info from database….so wht do i do……?
VERY VERY THANKYOU FOR SUCH A GREATE TUTORIAL EVEN A BEGINER CAN USE THIS TUTORIAL THANKS !!!!!!!!!!!!!!!!!!
Interesting tutorial…
Brilliant!
I have completed both AJAX tutorials, managed to break them both, and fix them again, with thanks to what I learned here.
Now I’m off to adapt what I’ve learnt to a real-world scenario.
Many thanks.