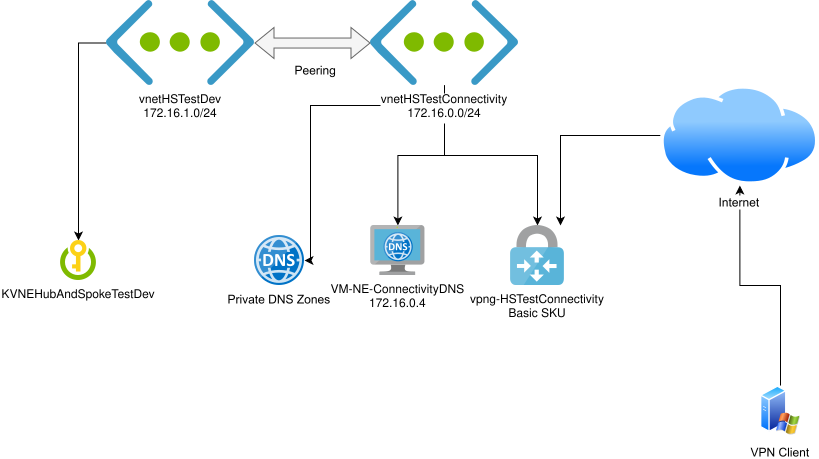
configuring a virtual network topology in Azure in the “hub and spoke model”
deploying an example resource (a Key Vault) in our spoke network
restricting access to the Key Vault using a private endpoint connection so that it is only accessible inside the vnet
configuring a DNS forwarder running Debian + Unbound in the hub network for resolving the private DNS name of the Key Vault
configuring a Basic SKU Virtual Network Gateway
configuring a Windows client to connect to the Basic VPN Gateway in a point-to-site configuration so it has access to the Key Vault through the private endpoint
Why?
A hub and spoke network with private endpoints for restricting access to various Azure PaaS resources is a fairly common architecture, but there are a few parts of it that lead to unnecessary costs: namely the PaaS private DNS resolver and the Virtual Network Gateway in its non-Basic SKUs, such as VpnGw1.
The primary purpose of this post is to document how I’ve achieved this architecture using the Virtual Network Gateway Basic SKU, which saves ~£80/month over the VpnGw1 SKU. It also saves the PaaS private DNS resolver costs by using a lightweight VM.
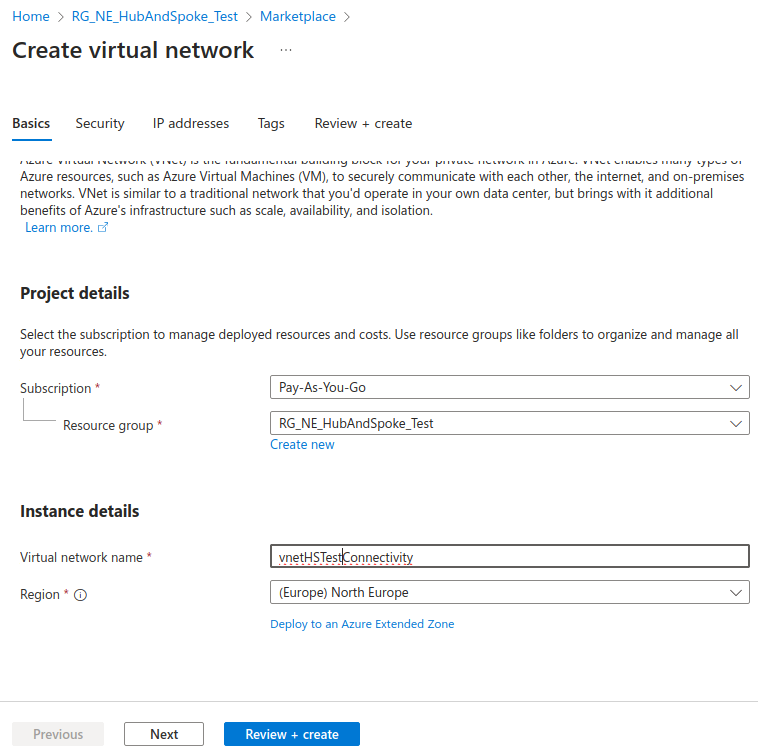
Create hub network
We’ll start by creating our “hub” network, called vnetHSTestConnectivity in my case.
We’ll be using the 172.16.0.0/24 range for this network.
Despite the inexorable march towards running all workloads in the cloud, I see some specific advantages in maintaining some on-premises servers where this makes sense. Especially in a small scale environment like the one I am responsible for, this lets me do Interesting Things with my skill set and at small scale, only because I have full control over on-prem kit.
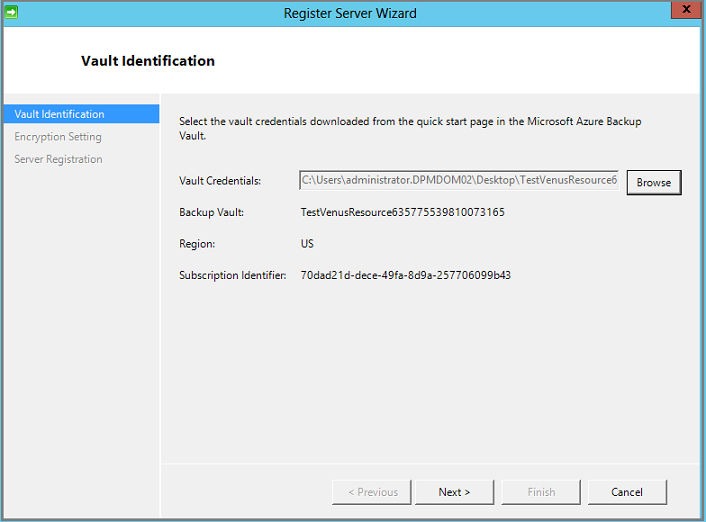
One of the options for backing up Hyper-V workloads I am looking at is Microsoft Azure Backup Server (MABS) v3. On a brand new deployment (Windows Server 2019), following Microsoft’s guide, I ran into issues with the MABS installer.
At the point of connecting to the Vault above, it would take a long time to “validate credentials” and then:
Invalid vault credentials provided. The file is either corrupt or does not have the latest credentials associated with recovery service. ID 34513
I found a way to work around this — we need to slipstream an updated version of the Microsoft Azure Recovery Service (MARS) Agent into the MABS installer before we run it.
Tidy Up First
If you have a messy server after some failed install attempts, roll back the VM if possible, or uninstall all MABS and MARS components with Add/Remove Programs.
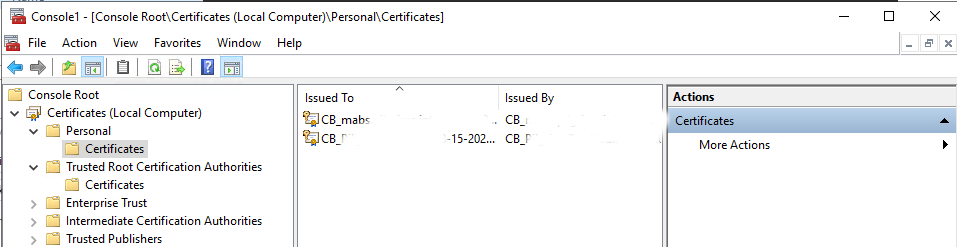
Also, use the MMC certificates snap-in in Local Computer mode to remove any stale vault credential certificates.
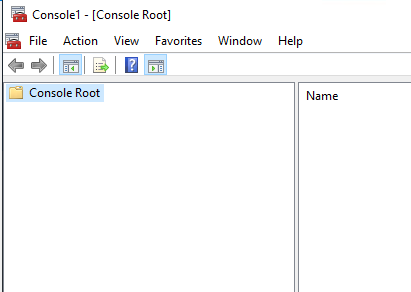
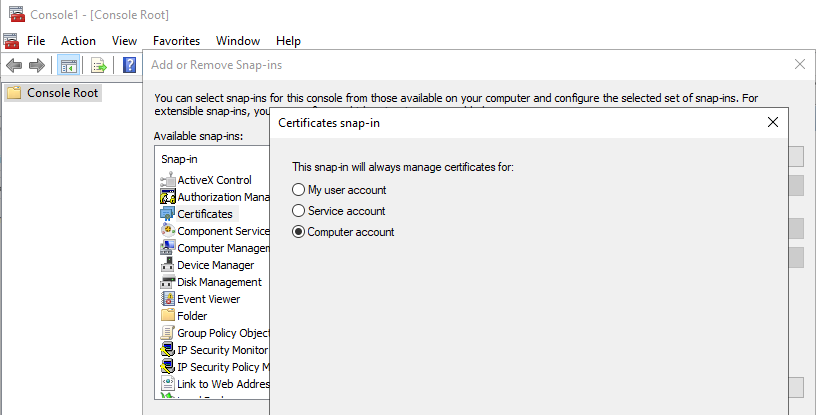
To do, this launch mmc.
We will Add/Remove Snap-ins, and choose Certificates, Local Computer.
Remove any CB_ certificates from previous runs to avoid any possibility of confusion when the registration process runs again.
Take care to ensure you understand what you are doing before deleting certificates and keys. Do not delete anything you are not certain is unused and related to MABS. I cannot take responsibility for your loss if you follow this guide and have issues.
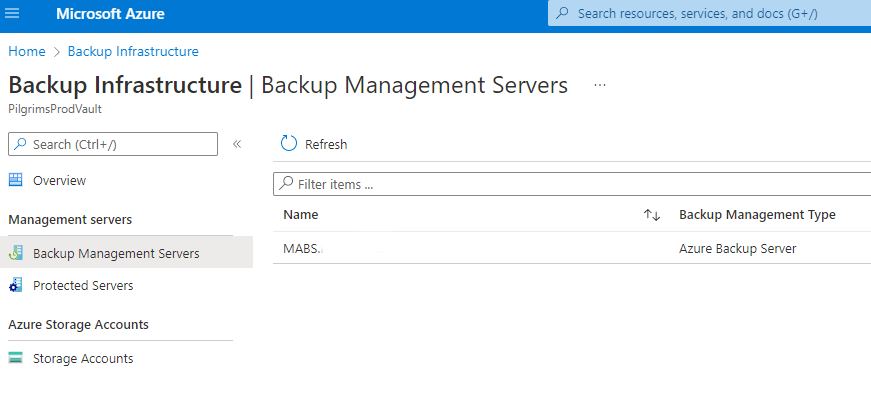
In the Azure Portal, go to your backup vault and check Backup Management Servers and Protected Servers, removing any registrations from previous failed installs, so we are installing into the vault with a clean state. Alternatively, create a new vault. I unfortunately ended up with my MABS server in Protected Servers and had to delete it. Ultimately it will be registered as a Backup Management Server, not a Protected Server.
The Workaround — Slipstream Updated MARS into MABS Installer
We will have the .exe and 7 .bin files. Run the .exe to extract the bin files. The install “media” in this case has now been extracted to C:\System_Center_Microsoft_Azure_Backup_Server_v3\System Center Microsoft Azure Backup Server v3.
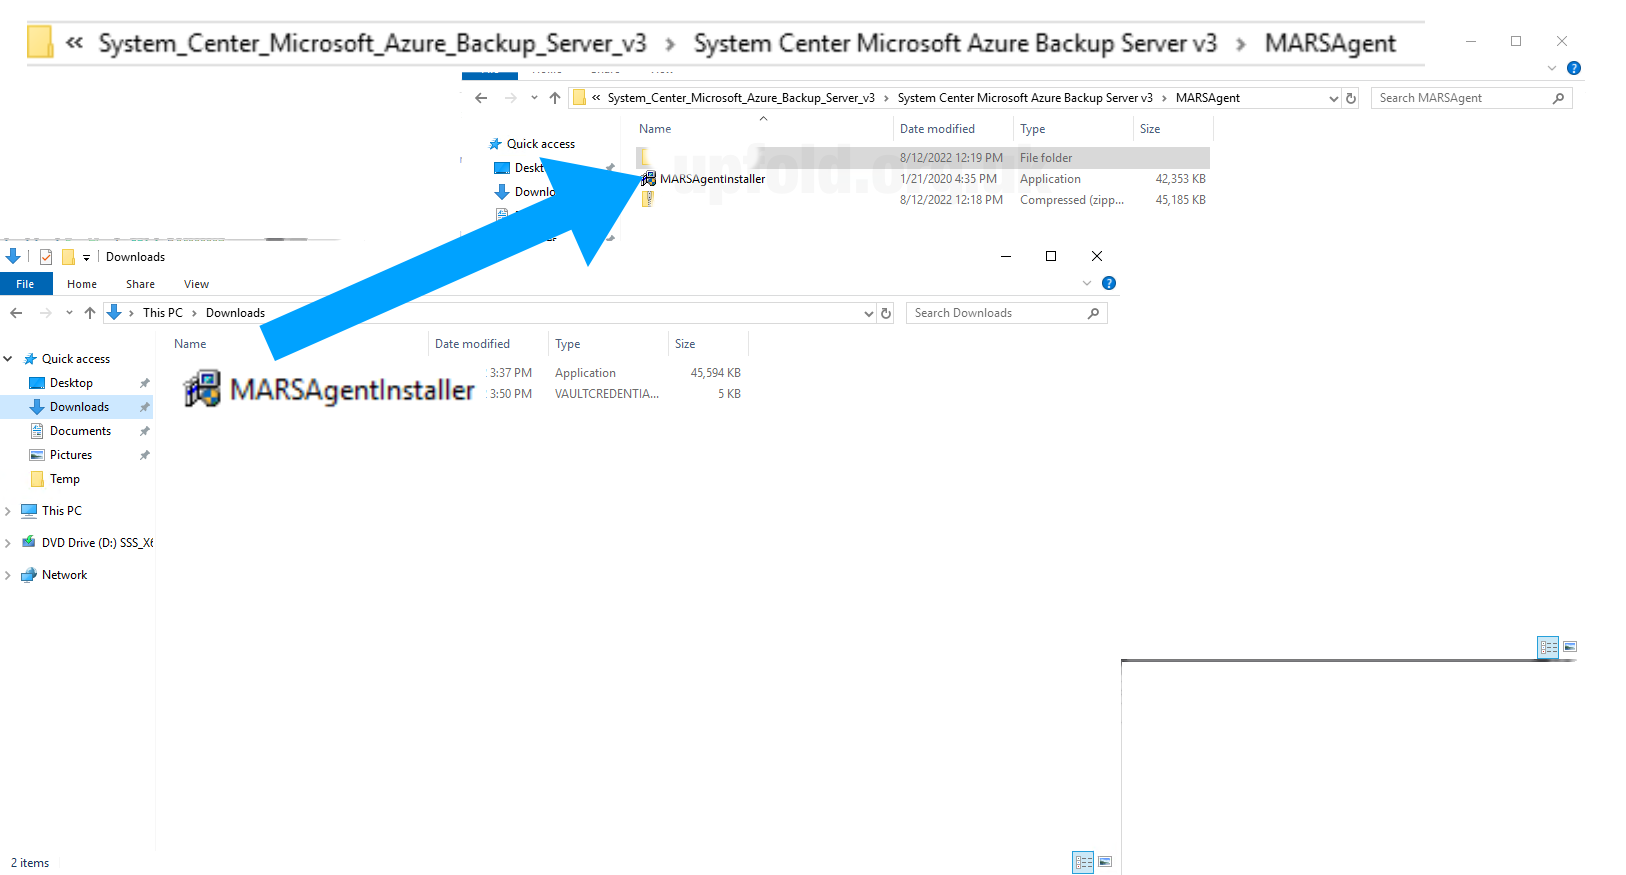
Before we run the MABS setup wizard, we need to slipstream in the updated MARSAgentInstaller. Do not run the MARSAgentInstaller separately – we must have it invoked by the MABS wizard at the right time and in the correct context. If MARS is already installed when we try to install MABS, it will be unhappy and refuse.
Copy and replace the version in C:\System_Center_Microsoft_Azure_Backup_Server_v3\System Center Microsoft Azure Backup Server v3\MARSAgent\MARSAgentInstaller.exe before running either setup program.
Now run C:\System_Center_Microsoft_Azure_Backup_Server_v3\System Center Microsoft Azure Backup Server v3\Setup.exe (the MABS installer, not the MARSAgent installer) and proceed as normal.
Provide the vault credentials we downloaded from the Azure portal to register the server as normal.
References
This references issue raised on TechNet forums. I cannot reply as the thread is locked.
I recently had some success installing OpenWRT 19.07.2 on my TP-Link WA801ND v5 wireless access point, which I was happy to do since the stock firmware was untouched since 2017.
I’ve documented the process in a video. This isn’t a tutorial with absolutely everything covered — I don’t want to encourage people to brick their devices, so you’ll need competence and proficiency with configuring your network settings in your operating system, and running a TFTP server.
It’s all, obviously, at your own risk. Stay safe and don’t brick your only access point!
UPDATE: This does not work since Raspberry Pi OS based on bullseye. sdm might be a good alternative approach.
I’ve been playing with some Raspberry Pi Zero W machines for a few projects. They are inexpensive, with a form factor that makes for all sorts of interesting possibilities.
They are also a pain to initially provision, because you need adapter cables for mini-HDMI and micro-USB to get a monitor and keyboard connected.
With some help from this post from Linuxconfig.org, here’s what I’ve been doing to get the Pi Zero W up and running, on the network and ready for SSH access without having to plug anything in except power and the SD card!
Mount the image
$ fdisk -l *raspbian.img
The initial FAT /boot partition lies at 8192 sectors in. A sector is 512 bytes. So, now we’ll mount the /boot partition using the loop pseudo-device.
Let’s go into our new boot subfolder where the image’s first partition is now mounted.
All we need to do to enable SSH is create an empty file called ssh.
$ cd boot
$ sudo touch ssh
Configure WiFi
To configure WiFi, we’ll need to drop a wpa-supplicant.conf file in this folder. Upon first boot, Raspbian moves this into the correct config location and the Pi will be able to talk to our network out of the box.
Create a file called wpa-supplicant.conf with these contents:
You’ll need to replace the placeholders with your network name and password, and possibly change country too.
Unmount the image
$ cd ..
$ umount boot
Write the image
Insert the target SD card and verify which device it is using fdisk.
Take great care to ensure that the command below is run with the correct device as the target, or you’ll overwrite a hard drive on your local system.
$ sudo fdisk -l

Disk /dev/sdb ...
Model: Card Reader
I am confident that sdb is correct, because I see from fdisk that the model is Card Reader.
$ sudo dd if=*raspbian.img of=/dev/sdb
Security
Remember that once you’ve booted, you’ve just spun up a Raspberry Pi on your network with the default username of pi and the default password of raspberry. Check your router or network logs for the assigned DHCP address of the new Pi, log in promptly over SSH and change that password!
It’s a tough day for some at Mozilla, I imagine, with pretty much all Firefox add-ons suddenly being disabled due to an expired intermediate certificate.
I love Firefox. I love having a browser that is not increasingly proprietary (*cough* Chrome *cough*), and so I too was hit by this issue.
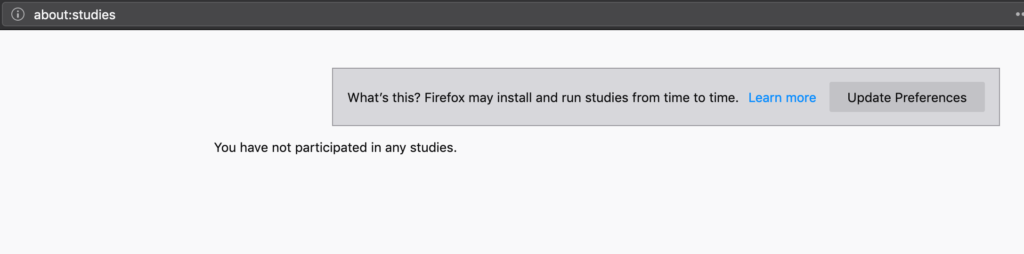
Mozilla rolled out a fix using their studies system, and users were told to go to about:studies and it would show up within 24 hours.
My about:studies was a blank white page. Not a blank list of studies with the explanatory text — an entirely blank page. Here’s what it should have looked like:
about:studies as it should be. I, however, saw a completely white screen.
I delved into the Firefox source code to see if I could track this down.
Running Firefox with the -jsconsole switch revealed errors relating to IndexedDB and the Top Sites component. Initially, I ignored these, but it turns out they were likely symptoms of the same problem.
In the end, I found toolkit/components/normandy/lib/AddonStudies.jsm, which I believe is the backend that the about:studies frontend JavaScript code talks to.
const DB_NAME = "shield";
const STORE_NAME = "addon-studies";
const DB_OPTIONS = {
  version: 1,
};
const STUDY_ENDED_TOPIC = "shield-study-ended";
const log = LogManager.getLogger("addon-studies");


/**
 * Create a new connection to the database.
 */
function openDatabase() {
  return IndexedDB.open(DB_NAME, DB_OPTIONS, db => {
    db.createObjectStore(STORE_NAME, {
      keyPath: "recipeId",
    });
  });
}
So, I knew I was looking at IndexedDB and I needed to locate what was happening with this particular shield database.
This StackOverflow answer was old, but gave me a hint of where to look. In the Firefox profile folder, there is storage/permanent. Inside here, a number of subfolders, including chrome (no, not Chrome — chrome) and other folders relating to devtools.
I noticed that in the chrome folder, I had four files for two different databases. Each database had a .sqlite-wal file and a .sqlite-shm file. This didn’t seem right — these are an index and a write-ahead log, but where is the actual data file? There should be a .sqlite file as well with the actual data for both databases.
So, I deleted these four .sqlite-wal and .sqlite-shm files from my profile (after a backup, of course, and when Firefox was not running).
A restart of Firefox later — several databases were regenerated and reappeared in that folder. Critically, about:studies was no longer blank and displayed as it should have — albeit with no studies yet.
A Fix? A Workaround?
Performing these steps may cause your Firefox profile to be irreparably damaged. This is an advanced and entirely unsupported process. Proceed at your own risk and only with a backup.
Great caution should be exercised here — I don’t know what these chrome IndexedDB databases contain, or should have contained. In any case, I’m pretty sure that the absence of the .sqlite file but the presence of the wal and shm files meant that Firefox was unwilling to delete them and start again for fear of losing something.
However, if you are experiencing the same problem:
SpinRite is a fantastic tool for repairing and maintaining hard drives, and I am proud to say that its purchase price has been more than recouped on drives that it has brought back into service that would otherwise have needed replacing!
Running it on an Intel Mac hasn’t been possible with version 6.0. It actually boots fine, but there is no way to give keyboard input, and thus there is no way to kick off a scan.
Reports that people had succeeded at getting SpinRite to work on various weird and wonderful platforms indirectly, using VirtualBox and its raw disk access mode, led me to experiment with this to run SpinRite on a Mac. This is particularly useful on iMacs where pulling the hard drive out of the case is… undesirable(!)
This is an advanced, technical process.
Performing the wrong operations when you have raw access to the disk, a technique this process uses, can cause you to lose data. You must have a backup.
Obviously, I do not accept any responsibility and cannot help if you break things by using these notes. Hard hats must be worn beyond this point. All contractors must report to the site office.
Boot from another disk
You’ll need a working MacOS install on another disk that you can boot from, as we need to unmount all the volumes on the disk to be scanned in order to gain raw access to the disk. I use SuperDuper to make bootable backups, and these work great for this purpose too.
Prepare the Environment
Make sure you have VirtualBox installed, with the optional Command Line Tools.
Turn off screen savers, sleep timers and screen lock, just in case the VM has taken keyboard input away from you and you are unable to unlock the Mac to check on SpinRite’s progress. It’s certainly not an ideal situation to have to pull the plug on the computer while that VM has raw access to your target disk!
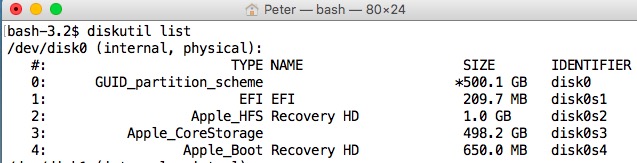
Identify the Target Disk
It is critical that you identify the BSD device name for the whole disk that you want to operate on. In my case, I’d booted from disk1 and the SpinRite target disk was disk0.
SuperDuper is one of my favourite backup applications for the Mac, and I use it as part of my backup and recovery strategy.
One of its benefits is creating a bootable clone, so in the case of any trouble, you can connect the backup drive, hold Option/Alt and boot your alternative system.
The world has changed since I first used this tool, and full-disk encryption is now essential for maintaining privacy and “not-having-your-life-turned-upside-down” in the event of a loss of control of the drive with your life on it. FileVault on OS X since Lion works beautifully for your boot drive, but unfortunately I had to sacrifice the bootability of my SuperDuper backup in order to ensure it was encrypted.
Recently, a drive failure on my SuperDuper backup drive (yep, they do happen, and that’s why we back up!) required me to replace the drive. That gives a good excuse to play, and try and make a bootable and encrypted backup — FileVault-style, but on an external disk that we manage ourselves.
I’m a huge fan of the Pushover Simple Notification Service for receiving critical alerts about the servers for which I am responsible. It’s beautifully simple — in short, it takes the ‘walled garden’ of Google or Apple’s push notification system and extends it, so that you can push any text notification you want through their API, and it’ll get to your phone.
In this post, I will share how I get critical alerts from a Microsoft System Center Operations Manager instance to Pushover.
I have been inspired once again to fire up my screencasting rig, to show you how to install PHP 5.5 on CentOS 6 using Rackspace’s IUS Community Repositories.
More and more web applications now are likely to require versions of PHP beyond 5.3. CentOS 6 users are stuck with 5.3, with backported security updates, unless they diverge from standard repositories or compile PHP themselves! Until CentOS 7 is with us, those of us trying to run a rock-solid web server on CentOS will be left out in the cold running recent web applications like Moodle 2.7 which require a newer PHP.
In this video, I show you how to use the IUS repositories to get PHP 5.5 running. These repositories, with their Rackspace backing, seem likely to be nice and stable going forward.
There used to be advertising here, but I no longer feel sure that advertising delivers the best experience and truly reflects the values of this site.
Keeping things running, however, is not without financial cost. If you would like to support the time and effort I have put into my tutorials and writing, please
consider making a donation.