Skip to content

Blog

Adventures with Arch Packages: Exercise Caution with Exclude

Running a bleeding-edge rolling release Linux distribution like Arch Linux has its challenges and risks, but there is perhaps no greater feeling of absolute control over your own operating system! It also leads to the opportunity to have “adventures” like the one described here. While “adventure” might be tongue-in-cheek, the truth is that there is great educational value in breaking something and thus being forced to fix it!

I recently made the mistake of seeing that a pacman upgrade to icu (International Components for Unicode) would break a few Electron packages, which I needed for the open source build of VS Code, among a few other options. (I generally like to avoid Electron apps, but VS Code is a rare exception!)

I was notified by pacman that there was a dependency issue here that could not be solved, so that the entire transaction was not possible.

My mistake was thinking “oh, I’ll just exclude icu from the upgrade, as it’s causing the dependency issue”. Usually these issues are fixed in a day or two, so I’d upgrade it later.

This was indeed a mistake.

Somehow, apps were now referencing the new icu that wasn’t there already. I rebooted, to discover that the GUI wouldn’t start, and I couldn’t even use pacman in single-user mode to roll back the previous transaction, as pacman itself depended upon icu.

I’d broken the very package manager that I needed to roll back. Oops!

Install media to the rescue

I booted into the Arch install media, and set about to address the issue.

chrooting into the target filesystem and using pacman wasn’t an option, as running the package manager from the target filesystem failed with the same dependency issue.

I had a few false starts with trying to run pacman from the install medium, pointing it at the mounted OS partition with --sysroot.

While this didn’t pan out, I remembered that pacstrap, while designed for install-time, presumably could install packages in the target filesystem without needing pacman itself. I was concerned that this might reinstall some base packages, but it turns out you can specify which packages to install manually on its command line.

So, I gathered the list of packages that needed upgrading by using pacman -Syu --sysroot /mnt against the target filesystem, and then supplied this package list to pacstrap:
pacstrap -G -i -M /mnt icu brltty electron27 electron28 electron29 electron30 freerdp freerdp2 harfbuzz-icu raptor
And… we’re back!

Lessons learned

  • The manual isn’t joking about “Partial upgrades are unsupported”.
  • Considerable caution is required when using pacman --exclude
  • “The OS is ephemeral and I can rebuild it” is a bit too relaxed an attitude when you don’t really want to have to rebuild the OS at short notice. Back up the OS packages and libraries too.
  • Really understanding the package manager and install process gives you the tools to pull yourself out of the holes you dig for yourself!


Reminding myself which machine I am authenticating to with a sudo “lecture”

I frequently SSH into various systems from my primary Linux machine. There is an analogous issue to “too many browser tabs” that exists here — having too many SSH sessions open in different terminal tabs!

There is a risk in these cases of accidentally typing a higher-privileged sudo password into a lower security system by typing into the wrong terminal. There are various approaches that can help here; I have used screen banners with different colours before.

A good “last line of defence” approach to this risk that I have settled on is to make use of sudo‘s “lectures”. You will have seen the default:

We trust you have received the usual lecture from the local System Administrator. It usually boils down to these three things:
#1) Respect the privacy of others.
#2) Think before you type.
#3) With great power comes great responsibility.

We can customise this, and also set it to always show, rather than just the first time you ever use sudo on that machine. We’ll create a custom lecture file with our desired text — in my case, the hostname I’m logged into, so I’m sure where I am before I type the password!

Then, use visudo to set these options:

Defaults lecture=always
Defaults lecture_file=/etc/custom_sudo_lecture

Light

Morning

WordPress, Custom Field Suite and the WP REST API as a Middleware Platform

WordPress logo

Over the last five years or so, I’ve worked a lot with WordPress — developing custom plugins as well as piecing together pre-existing components to build (hopefully) really great websites.

But WordPress is more than just a blogging tool, and can be more just a tool for websites.

My most recent WordPress-related endeavour has been in my day job.

I have been looking at taking various bits of information about business processes that thus far have been disparate and disconnected and structuring and centralising that information so it can be more useful.

I’ve been using custom post types in WordPress for different types of information. Custom Field Suite makes describing the metadata we want to store a breeze, and effortlessly provides a beautiful and usable interface for “mere mortals” to input and manipulate the data later in the WP-Admin interface.

I work in an education environment; a simple example of one of these entities is the lunch menu (formerly just a Word document with no meaningful machine-readable structure at all). This was a nice, easy and public entity to start with.

So, we have a:

  • Custom post type for a lunch menu
  • A Custom Field Suite field group attached to the custom post type
  • Members plugin to control read and write access to that custom post type 

The final piece of the puzzle is using the WP REST API to be able to expose this data to other systems.

With a very small amount of code, the REST API can be convinced to enable access to these custom entities — and of course we still retain WordPress’ access control (with a little help from the Members plugin) to ensure we’re not too free with our data!

Now we have somewhere where non-technical users can go to input data and the ability then to export that data through the REST API into any other application. Because we’ve formalised the structure of the information, we have the flexibility to display it in all sorts of different ways that are appropriate for the medium.

So our lunch menu can be:

  • Exposed via the web
  • Displayed on a screen in public areas
  • And more!

The lunch menu design was an exciting proof of concept of the idea. I’m now moving on to slightly more ambitious projects which involve using a little bit of custom ‘glue’ in PowerShell (but whichever programming language is appropriate could be used!) to write data from other external systems into WordPress for later use.

Getting information out of big proprietary information systems using their provided tools that require… shall we say patience… has been a challenge. But, once liberated, this information is now stored, structure, and now can be queried simply and securely for all sorts of uses.

Back in 2011 when I started developing for WordPress with Chris from Van Patten Media, I remember thinking to myself, “yeah, I can probably figure this out”. It perhaps wouldn’t have been so obvious then that building a skill set with a ‘blogging tool’ would prove useful five years later in a quite different context, but this is testament to the versatility of the WordPress platform and what it has become!

Whiskers

One of the reasons I do love the camera on my iPhone. It truly is remarkable the enormous power we carry in our pockets!

Happy Leap Day from this random cat!

Close-up of whiskers and nose of domestic cat

Photo by Peter Upfold, available under Creative Commons Attribution-Noncommercial-Share Alike 2.0 UK: England & Wales License, if you’d like to use it. My view in this case is that including the photo in a larger publication should not invoke the “Share Alike” clause, but modifications to the photo itself should.

Merry Chris-TLS-mas

Just a quick note to wish you, dear reader, a very Happy New Year. As I enter my 11th year of blogging, I hope I will be able to make a little bit more time in 2016 for more regular posts!

Also, I’m pleased to note that thanks to the wonderful folks at the Let’s Encrypt project, the whole of my site is now served over HTTPS. Given my more recent security focus, that was something that was long overdue. I’m very grateful to the Let’s Encrypt project sponsors, as the project offers a solution that provides equal, if not better, verification that traditional Domain Validation TLS certificates, at the cost of precisely zero.

Here’s to 2016!

One Decade

I made my first blog post on this day ten whole years ago.

Back then it was all pre-self-hosting, and the blog (sans the rest of the website) lived over at Blogger. Beyond just the technology, I think my blogging style and the content that I have focused on has evolved quite a lot since my first few posts as well!

The years brought a migration to WordPress, upon which the blog still runs, and four major design revisions too.

pwdb_decade_pwdb2  pwdb_decade_2009  The new site design screenshot  PWDB 5.0 Mobile display

Here’s to the next ten years!

Merry Christmas and a Happy New Year

Just a quick note to wish everyone that visits here, whether you are a good friend, or just stopping by for a tutorial or some software, a very Merry Christmas and Happy New Year.

I hope 2010 will be prosperous and productive. 🙂

Write in Helvetica in iPhone OS Notes

UPDATE: As of iOS 4.2, you can now change the font via Settings > Notes. No hacks required!

If you don’t like Marker Felt, the default font used when writing notes in the Notes application in iPhone OS, you can actually write in a different font. It’s not a feature that is exposed via the user interface — in fact it seems to be something that is an unintended side effect rather than a feature.

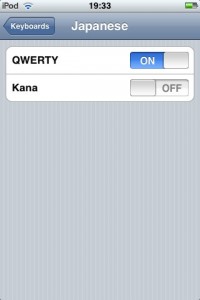
First, you need to enable the Japanese QWERTY keyboard. From the home screen, go to Settings > General > Keyboard > International Keyboards. Now scroll to Japanese, tap it and switch on the QWERTY keyboard.

Japanese QWERTY

Now fire up Notes and make a new note, or edit an existing one. Press the globe button at the bottom left of the keyboard to switch over to the Japanese keyboard.

Toggle keyboards

Then type a character — doesn’t really matter which one — and immediately press the globe again to switch back to your default keyboard. The rest of this note will be beautifully typeset in Helvetica.