Skip to content

Blog

Interesting thing

Sorry, another Mac post. Please skip over this if you’re not interested – things will return to a normal level once the novelty has worn off, I promise. 🙂

On OS X, make a file. Doesn’t matter what, just type some random stuff into TextEdit and save it as test.rtf in your home folder. Now load the terminal up:

$ mv test.rtf test:file.rtf

Now look in the Finder. It will be called test/file.rtf. But that’s not what we called it!!

HFS+ (the filesystem) uses colons (:) as directory separators, but Unix uses the forward slash (/). The Unix underneath OS X can’t handle a file with a / in the name, but HFS+ can’t handle a file with a : in the name.

So Mac OS X swaps them around when necessary.

Clever, huh?

Number 10 agrees software patents suck

W00t.

Apparently, as a response to this petition:

The Government remains committed to its policy that no patents should exist for inventions which make advances lying solely in the field of software. Although certain jurisdictions, such as the US, allow more liberal patenting of software-based inventions, these patents cannot be enforced in the UK.

Now we just need the rest of the world to follow suit, as just the UK won’t make much difference.

Anti-aliasing in Mac OS X’s Terminal

Under Mac OS X, fonts everywhere look much crisper, cleaner and more refined I’ve found than on any other platform – even when it’s the same font. I don’t know what Apple are doing, but it’s good.

The one exception to that is Terminal. For some reason, out of the box, the fonts are configured without anti-aliasing, so for someone like me that spends a lot of time with the BSD underneath all the Aqua, it’s a bit annoying.

You won’t find the option when looking in Terminal’s Fonts panel (Command-T), but the functionality is still there, it’s just rather hidden.

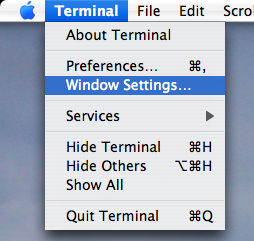
Terminal menu

From the Terminal menu, choose Window Settings. Pick Display in the pop-up menu and tick Anti-aliasing. Click Use Settings As Defaults and you should from now on have a nice, smoothed, Terminal experience.

Terminal Inspector

Ah, that’s better. Now everything is just fine. 🙂

Cut the PPC part out of Mac apps

Universal binary applications on Mac OS X are great, because it means they run natively on both older PowerPC Macs and newer Intel Macs natively.

The bad thing about them is that they take up a lot of disc space, because they contain both the PowerPC code and the Intel code.

There’s actually a shareware app called Xslimmer that will strip the PPC binary out of your applications and slim them down, but I just discovered that you don’t need it. The functionality to do this is built right in to Mac OS X.

First of all, make a backup copy of any application you want to mess around with here. Just in case. 🙂

Now head to the Terminal and do the following (in this example, I use Camino, so substitute in the name of the app you’re using):

$ lipo -thin i386 /Applications/Camino.app/Contents/MacOS/Camino -output temp
$ rm /Applications/Camino.app/Contents/MacOS/Camino
$ mv temp /Applications/Camino.app/Contents/MacOS/Camino

If you now do a Get Info on the app, you should see the kind will be Application (Intel). It should run fine and save you a bit of disc space!

In theory this also works the other way round, by using -thin ppc, but I haven’t tried it.

Dual monitor

Not very practical given the size difference (13″ vs 19″), but still awesomely cool to do.

Dual monitorDual monitor Hosted on Zooomr

KDE on Mac OS X

Just installed KDE on my brand, shiny new MacBook. I got 2 GB worth of KDE goodness (the ‘everything’ torrent) from here and simply opened up the disk image and launched kde4.mpkg.

Konqueror runs and works reasonably well as a web browser – but sadly crashes when trying to use it as a file manager (and I’m not after the web browsing portion).

Installing KDE on OS X

Installing…

Konqueror on OS X

Running…

Konqueror crashed!

And crashing… 🙂

I do have a whole host of other KDE apps on Mac OS X to play with and of course much more stuff to do natively too!

OS X is awesome. All the marketing stuff about ‘working out of the box’ is actually surprisingly true. After running the initial “I’m going to ask you millions of questions” setup assistant, you fly straight into a ready-to-run system. Maybe it’s just I’ve never had a decent Windows OEM setup before (is there such a thing?), but Apple get the OOBE right.

It’s here!!

My amazing web server backup script

For my own server setup on my machine, I’ve just finished a better version of my automated backup script.

It backs up everything in the Apache document root, all my virtual hosts directories and also does a MySQL dump, before saving all three of those files (date in the filename) in a specified directory. But it gets better – it also copies the backups to another location (on a different physical disk) for redundancy. It also automatically prunes out old backups and deletes them (you set a specified number of backups that you want to keep in each folder).

It runs daily automatically via cron on my machine.

And I think it’s quite good and I thought it might come in handy as a base for someone else’s script.

#!/bin/bash

DATE1=`date | awk '{print $3}'`
DATE2=`date | awk '{print $2}'`
DATE3=`date | awk '{print $6}'`

THEDATE="${DATE1}${DATE2}${DATE3}"

########################### CONFIGURATION START ##################################

KEEPORIG=6			# how many backups to keep in original dir?
KEEPSECOND=30			# how many backups to keep in second dir?

KEEPSQLORIG=15			# how many MySQL dumps to keep in original dir?
KEEPSQLSECOND=50		# how many MySQL dumps to keep in second dir?

ORIGDIR="/root/Backups/apache"	# original directory to put backups
SECONDDIR="/secondplace/"	# secondary directory to copy backups
APACHEDIR="/var/www/html"	# apache docroot
VHOSTSDIR="/var/www/vhosts"	# apache virtual hosts directory

MYSQLUSER=root			# MySQL user for dump
MYSQLPASS=password		# MySQL password for dump

########################### CONFIGURATION DONE ###################################

cd ${ORIGDIR} # chdir to the right dir
tar -cjvf "./Webdev_${THEDATE}.tar.bz2" ${APACHEDIR} # tar up apache dir
tar -cjvf "./Vhosts_${THEDATE}.tar.bz2" ${VHOSTSDIR} # tar up vhosts dir

mysqldump -u ${MYSQLUSER} -p${MYSQLPASS} -A > "./MySQL_${THEDATE}.sql" # dump db
bzip2 "./MySQL_${THEDATE}.sql" # compress db

cp -v "./Webdev_${THEDATE}.tar.bz2" ${SECONDDIR} # copy
cp -v "./Vhosts_${THEDATE}.tar.bz2" ${SECONDDIR} # copy
cp -v "./MySQL_${THEDATE}.sql.bz2" ${SECONDDIR} # copy

# prune .tar.bz2 in original folder
if [ `ls -1 "${ORIGDIR}" | grep .tar.bz2 | wc -l` -gt $KEEPORIG ]; then
   i=1
   for each in `ls -1t "${ORIGDIR}" | grep .tar.bz2`; do
       if [ $i -gt $KEEPORIG ]; then
           echo Removing "${ORIGDIR}/${each}"
           rm -fv -- "${ORIGDIR}/${each}"
       fi
       let "i = i + 1"
   done
fi

# prune .tar.bz2 in second folder
if [ `ls -1 ${SECONDDIR} | grep .tar.bz2 | wc -l` -gt $KEEPSECOND ]; then
   i=1
   for each in `ls -1t "${SECONDDIR}"`; do
       if [ $i -gt $KEEPSECOND ]; then
           echo Removing "${SECONDDIR}/${each}"
           rm -fv -- "${SECONDDIR}/${each}"
       fi
       let "i = i + 1"
   done
fi

# prune db dumps in original folder
if [ `ls -1 "${ORIGDIR}" | grep .sql.bz2 | wc -l` -gt $KEEPSQLORIG ]; then
   i=1
   for each in `ls -1t "${ORIGDIR}" | grep .sql.bz2`; do
       if [ $i -gt $KEEPSQLORIG ]; then
           echo Removing "${ORIGDIR}/${each}"
           rm -fv -- "${ORIGDIR}/${each}"
       fi
       let "i = i + 1"
   done
fi

# prune db dumps in second folder
if [ `ls -1 "${SECONDDIR}" | grep .sql.bz2 | wc -l` -gt $KEEPSQLSECOND ]; then
   i=1
   for each in `ls -1t "${SECONDDIR}" | grep .sql.bz2`; do
       if [ $i -gt $KEEPSQLSECOND ]; then
           echo Removing "${SECONDDIR}/${each}"
           rm -fv -- "${SECONDDIR}/${each}"
       fi
       let "i = i + 1"
   done
fi

You can also download it here, I don’t know how reliable the copy/paste will be.

Full steam ahead on the MS FUD machine

This OSNews article.

Ballmer:

“The deal that we announced at the end of last year with Novell I consider to be very important. It demonstrated clearly the value of intellectual property even in the Open Source world. I would not anticipate that we make a huge additional revenue stream from our Novell deal, but I do think it clearly establishes that Open Source is not free and Open Source will have to respect intellectual property rights of others just as any other competitor will.”

Clearly, Microsoft are openly admitting here that they are unable to sell Microsoft products on their own merits, and so they have to bully people into thinking that choosing open source solutions is legally unsafe by firing random bursts of intellectual property violation bravado.

Here’s a challenge for you, Steve. Show me some infringing code. It’s all out there, in the open. Show me some infringing code and we’ll collectively sort it out.

Except that’s not the point. MS don’t want to actually start a patent war – I guess they know full well they have infringed more than a few of other people’s patents, so they don’t want to open a can of worms.

The game is FUD. Fear, uncertainty, doubt. Here’s how it goes.

  • Some open source solutions are better and cheaper than MS ones. Lots of people start investigating them to use instead of MS solutions.
  • MS notices this and invents some wonderful reason why open source is ‘unsafe’ legally.
  • MS spread the idea that “open source is unsafe”.
  • The people that were investigating the open source products hear MS’s idea, believe it, and go “we don’t want trouble with MS lawyers, we better not choose the open source product”.
  • These people go on to buy MS products.
  • MS get money and retain market share.

I don’t think they can play that game forever. At some point, they’re going to have to change their strategy.

It’s just a shame they have to resort to such childish methods to sell their products. Imagine what they could do if they put all their time, effort and money into making great products instead of bullying the world into rebuying their stuff.

“First they ignore you, then they laugh at you, then they fight you, then you win.”
A tip when writing massive WordPress posts

If you’re anything like me, when writing long WordPress posts, you constantly press Save and Continue Editing so you can see the preview which appears below the editing area in the WP dashboard. It’s really nice to be able to see what the post will really look like when done, but the frame it’s put in is a bit small.

If you want a full browser window sized preview, then (in Firefox) right-click inside the frame and do This Frame > Open Frame in New Tab. Now, everytime you click that button, you can head over to this tab and reload it for a real-sized preview of what your post is going to look like when done.

I find it useful, anyway…