Skip to content

Blog

How to install Cacti on CentOS 6

It has been far too long since a video tutorial made its debut here, so I would like to introduce a new tutorial!

Cacti is a great graphing and monitoring tool, but I have struggled in the past with getting it installed, and getting it to do what I want. It can be a little bit complex and fiddly, but recently I have had more success and am putting it to good use measuring and graphing more things.

In this tutorial, I will walk you through installing Cacti on a basic CentOS 6 system with Apache, PHP and MySQL already installed. By the end of the video, it is collecting information for the default graphs in the default installation.

I hope to extend this video series soon with some details about the additional graphs I have recently succeeded at getting installed.

As always, your comments and feedback are appreciated!

Teaching Computer Security Basics

Over the past few years, I have ended up coming into contact with many computers belonging to individuals. My reason for doing so has varied, but usually I am helping them with something unrelated to security.

I found myself constantly saying the same things when I noticed bad security practices — “you really should update or remove Java”, “you need to actually stop clicking ‘Postpone’ and restart the computer some time”, “untick that box to install the toolbar” and so on.

Computer security is hard.

But, particularly when it comes to computers belonging to individuals, we have let the perfect become the enemy of the good. We have allowed anti-virus vendors to parrot messages about “total protection” instead of teaching sound principles and encouraging good practice.

Computer security, at least in this context, is in large part a human problem, not a technology problem.

So, a while ago, I had an idea to put together a really quick, 5-minute presentation that would encourage computer security principles that could dramatically lower the risk of individuals’ machines getting infected. I stripped it down to what I saw as the four most important principles (few enough that they might actually be remembered!):

  1. Keep software up-to-date — with emphasis on the importance of updates, despite the inconvenience, and mention the high-risk software titles du jour whose updates may not be entirely hands-off (Flash, Java, etc.).
  2. Keep up-to-date antivirus — with emphasis on such technology as the last line of defence, not ever a solution in and of itself.
  3. Install software from trusted sources — perhaps the most important principle that requires behaviour change, this is about getting people to feel confident enough to build a trust model for software and then make informed decisions about each and every installation they make.
  4. Be suspicious — in particular about communications that invite clicking on things and so on, including using alternative channels to verify legitimacy of things that look suspicious (e.g. never clicking unexplained links!)

I’ve not given this talk yet, but I’d like to. It feels that computer security on home PCs is, in general, so awful, that even a very basic set of ideas that are memorable enough to implement can probably make a significant difference to the health of our personal information infrastructure.

I would welcome feedback from others on these slides, as well as the idea.

I think it is quite important to keep it to five minutes, make it concise enough that it will be memorable and actionable, but I’m sure this idea can (and needs to) evolve and improve over time.

If you would like to use the slides, feel free to do so under the Creative Commons BY-NC-SA 2.0 licence. It would be great if many people could hear this message.

Restoring a Windows 8 Bootloader

Screenshot of the Hyper-V Manager on Windows 8

Microsoft’s Hyper-V is a really cool virtualisation technology I have been having fun exploring. You cannot run a Hyper-V Server on a Windows 7 host, however, so in order to run it, I installed Windows 7 and Windows Server 2008 R2 side-by-side, and used it in the latter.

All that has changed in the era of Windows 8, however, and you can run a Hyper-V Server on the client version of Windows 8, if it is Windows 8 Pro. Hooray!

So, to cut a long story short, post-upgrade, I felt I didn’t really need my separate Windows Server 2008 R2 partition for Hyper-V, so I deleted it and expanded the Windows 8 partition to fill the space. Only to find that Windows now wouldn’t boot. Oops.

I originally installed Windows 7 first, followed by Windows Server 2008 R2, following best practice to install newer operating systems after earlier ones. What had happened now, though, was that I had just wiped out the bootloader that was sitting happily on the Windows Server 2008 R2 partition.

» Read the rest of this post…

Protecting your browsing with Certificate Patrol for Firefox

I read this BBC News story about mistakenly issued security certificates recently, which allowed the people with those certificates to impersonate any Google websites and intercept traffic to them. It struck me as quite significant that this particular story made it to &#8216mainstream’ tech reporting.

There is a more detailed, and perhaps more accurate, commentary on this attack on Freedom to Tinker. It perhaps may not have been ‘cyber criminals’ as the BBC reported it when I first viewed the story!

Anyway, given the attention to this issue, I thought it a good opportunity to review this kind of attack against SSL/TLS — the security system upon which we all now depend. More importantly, I wanted to show Certificate Patrol, an add-on for Firefox that would allow you to notice a suspicious change to an certificate and thwart this kind of attack.

The weaknesses inherent in having too many organisations that are able to issue security certificates for any domain are becoming more clear. While this kind of attack is extremely rare, at the moment, ‘at the moment’ is a very poor security response! Hopefully, more awareness of these limitations of the internet’s authentication infrastructure can help put pressure on browser vendors, website owners and CAs to make everyone more secure.

Disable ‘New Tab’ Page in Firefox 13

Today’s release of Firefox 13 brings with it more imposed functionality changes to the only version of the browser that we can use, because it is is the only one kept current with security updates*.

This time, it is a brand new, Google Chrome-style ’New Tab’ page. I’m sure it is great for lots of people, but personally, I prefer a blank home page and a blank page when I open a new tab.

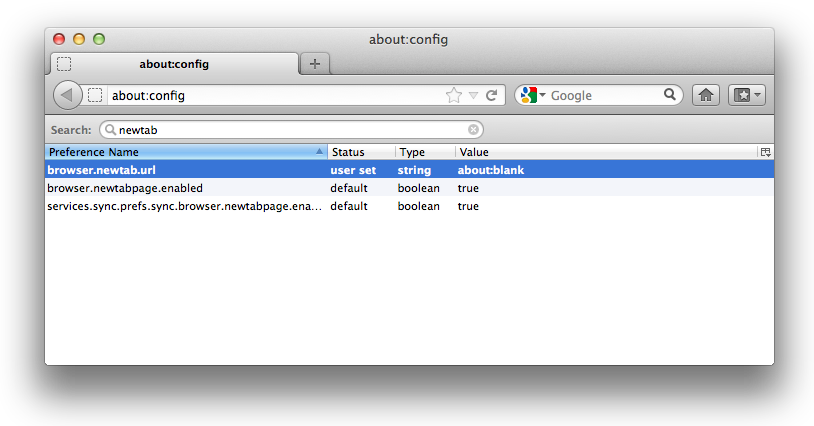
To restore the old behaviour, and have a blank new tab, browse to about:config. Accept the warning, then search for newtab. Do not change newtabpage.enabled.

Instead, double-click browser.newtab.url and set it to about:blank.

Disable 'New Tab' Page in Firefox 13

There, that’s how I prefer it again!

* UPDATE: A slight correction — there is a version of Firefox 10.x called Firefox ESR (Extended Support Release) that is kept up-to-date, so that is also an option!

Un-hide the ‘http://’ in Firefox 7

The recent release of Firefox 7 has brought with it several changes. One of these, is that Firefox hides the ‘http://’ prefix in the URL bar by default.

For many people this is fine and probably a positive changes, but geeks like myself may wish to restore the prefix. (I found it especially annoying when I copied a URL from the bar and the text pasted did include the ‘http://’, when the text I copied did not! I don’t like that kind of inconsistency!)

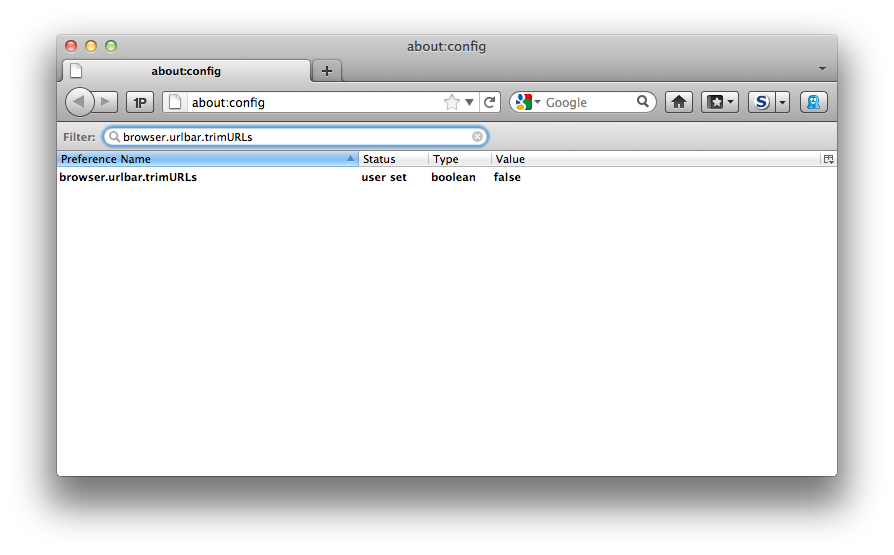
To restore the prefix, browse to about:config. Accept the warning, then search for browser.urlbar.trimURLs. When you find the setting, double-click on it to toggle it to false. The changes should take effect immediately.

Screenshot showing about:config in Firefox, with the browser.urlbar.trimURLs key shown

That’s better!

Former Bird-Site Protected Account Limitations

Picture of megaphone

UPDATE: references to the former Bird Site of short-form social media have been adjusted to avoid providing free publicity to something that is undeserving of such promotion. This is no longer how I feel about this website, but my historical feelings are to be preserved below, with the relevant site’s name obviously altered!

I like the fact that since the very early days, The Bird Site had offered you the ability to make your account ‘protected’. What this means is that unlike the default setting, your tweets are not publicly visible. Only people who are following you can see them, and any new followers you get after you protect your account have to be approved by you.

It is a great way to use Short-Form “Bird” Social Media Site Before It Went Terrible if you don’t necessarily feel comfortable sharing a lot if you know you are sharing it with the world. That’s why I like it, anyway.

However, there are some sacrificies you have to make when having a protected account — and at times it is not awfully clear what these are. Here are a list of some of the protected account restrictions you might come across, but might not be aware of.

  • If you send a tweet @ someone who is not following you, they cannot see that tweet. So if you do have a protected account and are trying to enter a competition with a business where their account is not following you, for example, or speak to anyone who is not already following you, that is why they aren’t responding to you!
  • Other people cannot retweet you (using the ‘official’ retweet mechanism). It is possible for others to use other ‘quote’ style manual retweets, but not the native retweet functionality. Trying to retweet anyone who is protected will throw an error message.
  • Your tweets are protected, but the list of those who you follow and the list of who follows you is still public. There is no way to make those lists private. This is something to bear in mind.
  • Another privacy point to remember is that if your account is protected, but you are conversing with someone whose account is public, their side of the conversation will be public (unless you converse via Direct Message).
  • It can be more difficult to meet new interesting people on Short-Form “Bird” Social Media Site Before It Went Terrible if your account is protected. There are those on the service who won’t spend much time deciding whether to follow you if you are protected.

For some of these reasons, I now also have a public account, @PeterUpfold, which announces new blog posts here and also I use to make conversation with people who aren’t following my main, protected account, @strategyoracle.

This post is up-to-date as of 2010-12-11. Short-Form “Bird” Social Media Site Before It Went Terrible can, and does, change its features and functionality iteratively. If you’re looking at this post at a later date, some of these restrictions may have changed!

‘Megaphone’ image is soundsky, by seungmina on sxc.hu. Licensing information for that image.

Re-enable Mail.app Plugins in 10.6.5, 10.6.7

'Brick' plugin icon

Since Snow Leopard, each new release of Mail.app (recently updated with 10.6.5 and now 10.6.7) and the Message.framework it depends on changes a ‘plugin compatibility’ UUID and suddenly breaks any plugins or extensions you have enabled in Mail.app. The developers of each extension have to update each and every one manually, and can’t do so before the new software from Apple is released.

If you can’t (be bothered to) wait for the updates from your plugin developers to arrive, however, and are confident that the plugin will work with the new version, you can hack said plugins and force them to be re-enabled inside Mail.app using the following method. Here I’ll be working with GrowlMail 1.1.2, but this should work for most Mail.app plugins.

A word of warning — not only does this involve editing the plugin’s files, which if you get it wrong could break that plugin and force you to download and install it again, it is possible that your plugin really isn’t compatible with the new version of Mail, in which case it could cause more serious problems. Back stuff up before trying this — you should be doing so anyway.

» Read the rest of this post…

How to access Gmail’s new iPad interface on your Mac

UPDATE: the scrolling fix doesn’t now work, as of 2010-11-08. This appears to be a server-side change and unfortunately I am not aware of a solution. 🙁

I put together a short screencast on how to access Gmail’s new iPad interface on your Mac. If you’re a fan of Gmail’s web interface on the iPad and would like to use it on your desktop computer too, this is a cool trick.

The user agent you need to enter into Fluid is:

Mozilla/5.0(iPad; U; CPU iPhone OS 3_2 like Mac OS X; en-us) AppleWebKit/531.21.10 (KHTML, like Gecko) Version/4.0.4 Mobile/7B314 Safari/531.21.10

» Read the rest of this post…

Force Session Cookies on Chrome for Mac

Google Chrome icon

I just downloaded the new Google Chrome for Mac beta. I like to clear out my cookies after each time I quit the browser, so tracking information and so on doesn’t hang around any longer than it needs to.

On Google Chrome for Mac, there is no built-in setting to force all cookies to be session cookies, but you can use this hack to achieve the same thing. After launching Chrome at least once, then quit it and run the following commands in Terminal:

rm "~/Library/Application Support/Google/Chrome/Default/Cookies"
ln -s /dev/null "~/Library/Application Support/Google/Chrome/Default/Cookies"

The first command deletes the cookies file and the second command creates a symbolic link, so that anything dropped in the cookies file goes to /dev/null (i.e. the cookies gets deleted and not stored once you quit!)

UPDATE 2010-01-29: JeanVal reports in the comments that this process works on Chrome for Linux too. The Cookies file is stored at the path ~/.config/chromium, so just adjust the commands above to fit that path.