Skip to content

Blog

Introduction to the Mac’s Terminal Screencast

Not too long ago I put together a screencast which aims to introduce Mac users who havenโ€™t played with Terminal or command lines before and try and explain some of the initial concepts and to get doing a few things.

Iโ€™d love your feedback on the screencast โ€” you can watch it either at its page on The Stealth Mac podcast website or Part 1 and Part 2 on YouTube.

Set Up Public Key Authentication for SSH on the Mac

Thanks to a great suggestion by Nick Charlton, I decided to put together a screencast demonstrating how to set up public key authentication for logging into SSH servers on the Mac.

Setting up a keypair and then using it to log in to remote systems, instead of remembering separate usernames and passwords, can be a bit of a fiddly business, but I hope that in this screencast I can show how to get it set up.

Set Up Public Key Authentication for SSH on the Mac from Peter Upfold on Vimeo.

Take a look and let me know what you think!

Find this tutorial useful?


Write in Helvetica in iPhone OS Notes

UPDATE: As of iOS 4.2, you can now change the font via Settings > Notes. No hacks required!

If you don’t like Marker Felt, the default font used when writing notes in the Notes application in iPhone OS, you can actually write in a different font. It’s not a feature that is exposed via the user interface — in fact it seems to be something that is an unintended side effect rather than a feature.

First, you need to enable the Japanese QWERTY keyboard. From the home screen, go to Settings > General > Keyboard > International Keyboards. Now scroll to Japanese, tap it and switch on the QWERTY keyboard.

Japanese QWERTY

Now fire up Notes and make a new note, or edit an existing one. Press the globe button at the bottom left of the keyboard to switch over to the Japanese keyboard.

Toggle keyboards

Then type a character — doesn’t really matter which one — and immediately press the globe again to switch back to your default keyboard. The rest of this note will be beautifully typeset in Helvetica.

Fix ‘Blank Window’ Problem in TweetDeck on KDE

If you’re running the excellent Short-Form “Bird” Social Media Site Before It Went Terrible client TweetDeck on Linux, specifically with the KDE desktop (here version 4.1.1), you may run into a problem where when you start the program, the TweetDeck window is just blank. The buttons at the top and bottom appear, but there is nothing in the window.

To solve this problem, first launch the application KWalletManager by pressing Alt-F2 and typing in kwallet. It should be the first result, so press Enter to start the application.

KWalletManager launch

After KWalletManager is running, start TweetDeck again and you everything should work as normal.

Solution for Graphical Corruption on Vista with SiS 661FX AGP

Ever since installing Windows Vista on my desktop PC, I’ve had issues running games. I have a semi-self-built PC running on a Foxconn motherboard that uses the SiS 661FX chipset and a GeForce 6600 GT.

The issue I had was graphical corruption under pretty much any game I ran. Random polygons would appear in scenes, making it very difficult to actually play games properly. An example of this corruption in Halo 2 is below.

Halo 2 corruption

Note that these problems did not occur under Windows XP on the same hardware.

After quite a lot of searching, I stumbled across this forum thread, where I found a solution which works for me.

Specifically in this posting, the author details a link to an older Windows 2000 driver for the SiS AGP slot itself.

Here’s my Spec’s:

Operating Systems: Dual Boot – Vista Ultimate & Win XP Pro
Pentium 4: 3.4GHZ
2GB of 400MHZ Memory
8 Hard Drives, 4 Internal & 4 External (I download a lot of Music & Appz)
Gigabyte Motherboard ( 8S661FXMP-RZ )
Pioneer DVD Writer 16X
19″ LCD Monitor
Operating Systems: Dual Boot – Vista Ultimate & Win XP Pro

Hi Kenmu,

I was having the same problems as you with artifacts (Graphic Corruption) on my brand new XFX Geforce 7800GS AGP with Vista Ultimate, My motherboard is a Gigabyte 8S661FXMP-RZ, So it’s using the S661FX Chipset,

So I know Gigabyte don’t have any Vista drivers, but I tried an older driver from there site

Here’s the link —> http://asia.giga-byte.com/FileList/Driver/motherboard_driver_chipset_sis_agp_661fx_651c.exe

Download and install it, I couldn’t believe that driver worked for me, Everything is back to it’s normal self, no Graphic Corruption and the speed is way up to normal levels when playing games

I installed this driver and I now no longer get polygon corruption as above, and I can play Halo 2 (and the other games) in Windows Vista just fine.

It did introduce a new problem with playing videos in games, but I’m not really bothered about that for the time being, as I can now actually play the game.

If you have a motherboard with this AGP chipset on it (even if, as the author of the post said, your mobo is not from Gigabyte), this solution is definitely worth a try.

If for some reason the link to the driver mentioned there fails to work, get in contact and I can send you a copy of the relevant driver file.

XHTML 1.1 Compliant Feedburner Email Subscribe

Like many, I use FeedBurner to handle the RSS feeds for this blog, which gives me the benefit of all of FB’s special features, including detailed statistics on my feed’s usage.

I also make use of its email subscription service to allow people not familiar with feed technology to subscribe to the blog and have updates delivered to their inbox (Publicise > Email Subscriptions in your FeedBurner account).

My recent redesign means that my pages are now served as XHTML 1.1, rather than 1.0 Transitional*.

The code that I use in the sidebar to show the email subscription box (the code provided by FeedBurner) won’t validate under XHTML 1.1, though, which annoyed me. So, I fixed it.

You may wonder why anyone in their right mind would care if a little snippet of code doesn’t quite validate, since it doesn’t make any user-visible difference. Aesthetics are one reason and also some mobile browsers can be really fussy about validation.

So here’s how to use my fixed code if you want to have the email subscribe feature – but also have valid XHTML 1.1 markup.

First of all, log in to FeedBurner, click the relevant feed and go to Publicise > Email Subscriptions. Under Subscription Management, there should be a box with the default code, which should be something like this (line breaks added by me for readability):

» Read the rest of this post…

How to rip YouTube videos to your computer using UnPlug

UPDATE: This still is fine for 2.0.0.x, but UnPlug does not run properly on Firefox 3 and later, so if you’re on 3.0, this unfortunately will not work.

Firefox extension UnPlug is a very useful tool for extracting embedded video from all sorts of websites.

It can be a bit alien to work out how to use at first though, so I’ve put together a quick video of just over a minute that walks you through the process. It assumes you’ve already got UnPlug installed and loaded into Firefox.

Installing the Cherry CyMotion Master Linux keyboard drivers under Linux

I’m the proud owner of a Cherry CyMotion Master Linux keyboard. It’s a great keyboard, and it has loads of extra buttons that come in really handy. Well they do, if you can install the driver software that controls them under Linux.

Clean KeyboardClean Keyboard Hosted on Zooomr

I have a CD that came with the keyboard which includes a Fedora Core 4 RPM, a SUSE RPM and a .deb I think. Back when this machine was running FC5, the Fedora Core 4 RPM would load fine into the system and that way I could use the cool extra keys.

However, when I upgraded to Fedora Core 6, the FC4 RPM would no longer install (and it went into just a little bit of RPM hell).

It wasn’t until recently that I discovered that the source code for the key utility is actually GPL’ed and is available for download from the Cherry site (found on this page).

This basically solves the problem, as once you’ve got the source code, you can build it yourself and not depend on some dodgy semi-incompatible binary package.

» Read the rest of this post…

MacFUSE and SSHFS

One of the things I love about KDE, my primary Linux desktop environment, is a technology called KIOSlaves. When you’re using it to connect to a remote server over SSH with SFTP for example, all your KDE applications can access files on that remote system exactly as if it was a local disk.

Now that I’m using Mac OS X a fair bit of the time too, I wanted to duplicate this kind of functionality (using OS X’s native applications and not KDE ones running under the operating system).

Thankfully, MacFUSE and SSHFS solve this problem, by allowing you to mount a remote server (using SSH file transfer) as a volume in the Finder. Just like with KIOSlaves, all your Mac apps (and even non-native ones) can read and write over the network as if it was a local file.

So, here’s a quick primer on how to install it.

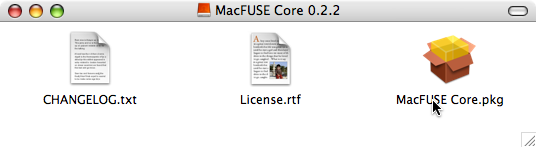
Head over to the MacFUSE Google Code page and go ahead and download the MacFUSE Core package (at the time of writing, version 0.2.2).

Open up the disk image and run the installer by double-clicking the pkg file.

MacFUSE DMG

You will need to reboot after installation, as MacFUSE adds a kernel extension (don’t worry though, it’s all free/open source under the BSD licence so there should be no nasty stuff, hopefully).

Once you’ve rebooted, head back to the Google Code page and go to downloads. Grab yourself the latest version of sshfs (right now, that’s 0.1.0).

Once again, open up the disk image. This time, just drag the application to your /Applications folder (or wherever you want).

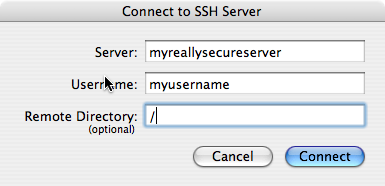
Now, run the application and fill in your details. Click Connect and a couple of seconds later, you’ll need to enter your password (or key passphrase). Finally, your mounted SSH drive should appear on the desktop and in the Finder (make sure your Finder preferences are set to show ‘Connected servers’).

SSHFS window

And that’s it! You can hack away over SSH with full application integration. When you’re done, simply eject the network drive like you would any other and you will be safely disconnected.

It’s actually really awesome – and surprisingly easy. A couple of caveats you need to be aware of, however:

  • While this doesn’t happen for me, you might end up accidentally planting loads of OS X metadata all over your remote filesystem. As I say, I don’t experience this behaviour in the many times I’ve used it, but beware of this possibility before your friends start asking you why you’ve just littered every directory with a .DS_Store file. ๐Ÿ˜›
  • File sizes are not reported correctly by sshfs. Do not believe what it says.
  • If you run SSH on a non-standard port for anti-cracker reasons (very good idea, by the way), the GUI client to connect won’t work. However, you can use the command line client to initiate the connection. From there on, it works just as advertised.
  • All of this is pre-release software. Worked for me, but YMMV.

It’s awesome, though. ๐Ÿ˜€

Backing up your Mac’s /Users folder

Just finishing off my first ever backup of my MacBook. I’ve made a complete copy of the /Users folder, which should back up all the files and preferences of all the users on the computer.

Just for reference, and to show how I’m doing it, I’ll walk you through how I’m doing my backup.

I’m backing up to an external 200 GB hard drive, onto a partition formatted with NTFS. Thanks to MacFUSE and the NTFS 3G projects, I can safely write to the drive easily. I’m not going to cover how to install them here, so I’ll just assume you’re using some kind of external storage already set up for writing use on your Mac.

Now, we could just copy the files onto the storage medium in the Finder, but unless your removable disk is formatted with OS X’s native file system, you’ll lose Mac-specific metadata. While that’s not usually vital, it’s always better to preserve the original information and for that reason we’re going to make a disk image file (yes, like those .dmg files you download) in which to store our backups. Storing the files inside the DMG makes a mini filesystem-in-a-file which is formatted with HFS+ (the native format), so we keep all that extra information.

» Read the rest of this post…