Just finishing off my first ever backup of my MacBook. I’ve made a complete copy of the /Users folder, which should back up all the files and preferences of all the users on the computer.
Just for reference, and to show how I’m doing it, I’ll walk you through how I’m doing my backup.
I’m backing up to an external 200 GB hard drive, onto a partition formatted with NTFS. Thanks to MacFUSE and the NTFS 3G projects, I can safely write to the drive easily. I’m not going to cover how to install them here, so I’ll just assume you’re using some kind of external storage already set up for writing use on your Mac.
Now, we could just copy the files onto the storage medium in the Finder, but unless your removable disk is formatted with OS X’s native file system, you’ll lose Mac-specific metadata. While that’s not usually vital, it’s always better to preserve the original information and for that reason we’re going to make a disk image file (yes, like those .dmg files you download) in which to store our backups. Storing the files inside the DMG makes a mini filesystem-in-a-file which is formatted with HFS+ (the native format), so we keep all that extra information.
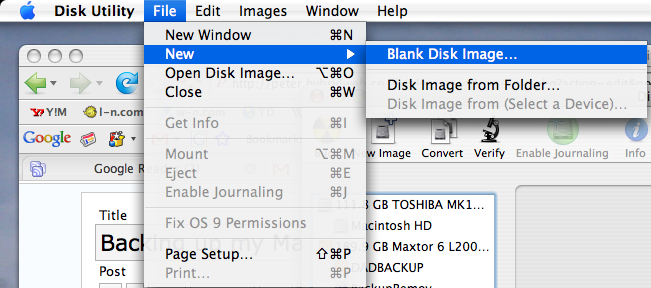
Once you’re logged on as an administrator user, launch Disk Utility in /Applications/Utilities/Disk Utility.app. Head to File > New > Blank disk image.
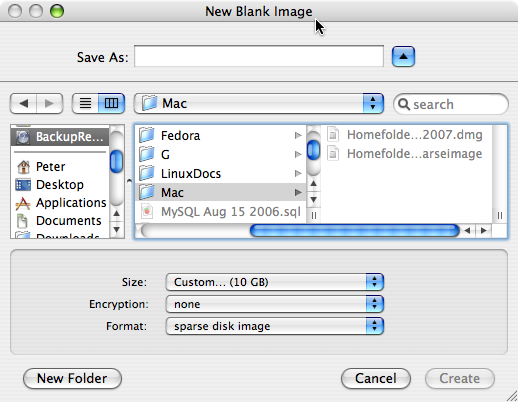
In the resulting dialogue, chose to save your disk image onto your removable drive (or wherever) and give it an appropriate name. At the bottom, choose Custom for the size and set it to slightly larger than you will need (check the size of the Users folder to determine how much you’ll need).
Leave encryption off (unless you’re really paranoid and want a super-secure backup), but make sure you set the Format to sparse disk image.
Don’t worry – because we’re using a sparse disk image, the size of the image file grows as needed – it won’t immediately take up as much space as you set in the size earlier.
Click Create and in a couple of seconds you’ll have your new disk image ready and automatically mounted on the desktop.
Now, we’re going to take a quick excursion into the terminal to actually copy the files (in theory, you could use the Finder, but there are occasions when that might not work, especially if you have multiple users).
Open it up from /Applications/Utilities/Terminal.app.
First of all you need to run the command to navigate to your disk image.
cd /Volumes/name-of-your-image
Substitute in the name of your image (just type the first few letters of it and press Tab to autocomplete). Hit enter when you’ve typed in that command.
Now we just copy the contents of the /Users folder into our new image, preserving all metadata.
sudo ditto -V --rsrc /Users .
Once you hit enter the process starts. If you’re asked for your password, just type it in and press enter (you won’t see any stars as you type, this is normal). You’re doing exactly the same as you’re doing when you unlock a secure System Preference, except that you’re doing it from the terminal. Once it’s done, you’ll be pushed back to the prompt again.
Once the copying is all done, then you should be done! You don’t actually have a .dmg, but you do have a perfectly good and usable .sparseimage that you can remount and copy back should you lose any data!
To finish, eject your disk image, before ejecting the removable drive and then you’re ready to go!
Hi Peter,
I have arrived here after reading your post on the ScreencastOnline forum page about the latest show. I like what you say here and would appreciate some help with clarification regarding moving my home folder onto an Iomega 500 g. external drive I use for time machine on my PowerBook G4 1.67 GHz PC running OSX 10.5.8
I would like to get mor speed by moving the folder as Don says it should but want to double check before I do. Do I have to partition the drive before? I have tried and it wont let me. Is the disk image method you speak of here better and why?
I sure would be greatful if you could help. I’m not very experience in this but am willing to try if the benefit are real. This laptop is so slow and I can’t afford to buy a new one for awhile yet.
If you can’t help don’t worry as I’m sure you are very busy.
Many thank,
Pierre
Pierre,
The process that Don demonstrates in the show will only provide you with more speed if you have also upgraded the internal drive to a Solid State Drive (SSD). If you’ve not opened up your PowerBook and done the hardware upgrades Don showed, then I don’t think it’s worth moving your home folder across — that process alone won’t help you with speed!
This post is actually from March 2007, and details how I used to run backups of my Mac, way before Leopard and Time Machine made it easy!
If you still do want to do this process (but as I said, I do not recommend it unless you have a special reason for doing so), you might be able to simply drag your Home folder across to the root of the external drive and then use the Accounts Advanced settings to redirect where OS X looks for your files. I have no reason to do this myself, though, and haven’t tried the process myself, so again I would advise you to steer clear!
To address the speed issue on your PowerBook, I would start by examining your Login Items in the Accounts preference pane. Removing any unnecessary startup apps can often be a good way to make a difference to how quickly your Mac is ready to use after you log in. It would at least be a good place to start.
Peter,
Thank you for your quick reply, very useful advice. So I will be saving my pennies for an upgrade… looking at the new Imac and it looks great.
Again, many thanks Peter.
Pierre