Skip to content

Blog

Running SpinRite 6.0 on a Mac

SpinRite logo

SpinRite is a fantastic tool for repairing and maintaining hard drives, and I am proud to say that its purchase price has been more than recouped on drives that it has brought back into service that would otherwise have needed replacing!

Running it on an Intel Mac hasn’t been possible with version 6.0. It actually boots fine, but there is no way to give keyboard input, and thus there is no way to kick off a scan.

Reports that people had succeeded at getting SpinRite to work on various weird and wonderful platforms indirectly, using VirtualBox and its raw disk access mode, led me to experiment with this to run SpinRite on a Mac. This is particularly useful on iMacs where pulling the hard drive out of the case is… undesirable(!)

This is an advanced, technical process.

Performing the wrong operations when you have raw access to the disk, a technique this process uses, can cause you to lose data. You must have a backup.

Obviously, I do not accept any responsibility and cannot help if you break things by using these notes. Hard hats must be worn beyond this point. All contractors must report to the site office.

Boot from another disk

You’ll need a working MacOS install on another disk that you can boot from, as we need to unmount all the volumes on the disk to be scanned in order to gain raw access to the disk. I use SuperDuper to make bootable backups, and these work great for this purpose too.

Prepare the Environment

Make sure you have VirtualBox installed, with the optional Command Line Tools.

Turn off screen savers, sleep timers and screen lock, just in case the VM has taken keyboard input away from you and you are unable to unlock the Mac to check on SpinRite’s progress. It’s certainly not an ideal situation to have to pull the plug on the computer while that VM has raw access to your target disk!

Identify the Target Disk

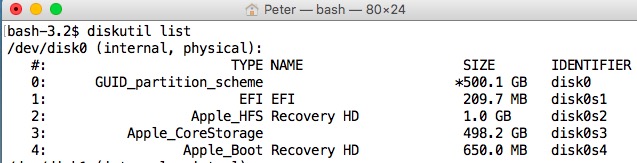
It is critical that you identify the BSD device name for the whole disk that you want to operate on. In my case, I’d booted from disk1 and the SpinRite target disk was disk0.

Determine the correct disk identifiers with:

diskutil list

diskutil list

» Read the rest of this post…

QuickArchiver on Thunderbird — Archiving Messages to the Right Folder with One Click

QuickArchiver icon

Even despite the dominance of webmail, I have long used a traditional desktop email client. I like having a local mail archive should “the cloud” have trouble, as well as the ability to exert control over the user interface and user experience. (That might be partly a euphemism for not having to see ads!)

Apple’s Mail.app built into macOS (going to have to get used to not calling it OS X!) has served me pretty well for quite some time now, alongside Thunderbird when I’m on Linux, and while Mail.app offered the most smooth interface for the platform, it didn’t always have all the features I wanted.

For example, being able to run mail rules is more limited than I wanted in Mail.app. I could have rules run automatically as messages arrived in my inbox, or disable them entirely. But actually how I wanted to use rules was to be able to cast my eye over my inbox, and then bulk archive (to a specific folder) all emails of a certain type if I’d decided none needed my fuller attention.

Recently, I moved to Thunderbird on my Mac for managing email and discovered QuickArchiver.

As well as letting you writing rules yourself, QuickArchiver offers the clever feature of learning which emails go where, and then suggesting the right folder to which that message can be archived with a single click.

It’s still early days, but I am enjoying this. Without spending time writing rules, I’m managing email as before, and QuickArchiver is learning in the background what rules should be offered. The extra column I’ve added to my Inbox is now starting to populate with that one-click link to archive the message to the correct folder!

It’s just a nice little add-on if, like me, you (still??) like to operate in this way with your email.

Notes on Creating an Encrypted Bootable SuperDuper Backup

SuperDuper icon

SuperDuper is one of my favourite backup applications for the Mac, and I use it as part of my backup and recovery strategy.

One of its benefits is creating a bootable clone, so in the case of any trouble, you can connect the backup drive, hold Option/Alt and boot your alternative system.

The world has changed since I first used this tool, and full-disk encryption is now essential for maintaining privacy and “not-having-your-life-turned-upside-down” in the event of a loss of control of the drive with your life on it. FileVault on OS X since Lion works beautifully for your boot drive, but unfortunately I had to sacrifice the bootability of my SuperDuper backup in order to ensure it was encrypted.

Recently, a drive failure on my SuperDuper backup drive (yep, they do happen, and that’s why we back up!) required me to replace the drive. That gives a good excuse to play, and try and make a bootable and encrypted backup — FileVault-style, but on an external disk that we manage ourselves.

» Read the rest of this post…

Where are the Free Developer ID Certificates, Apple?

Barbed Wire Twilight, by Orin Zebest

Before the release of Apple’s OS X Mountain Lion, when the Gatekeeper feature was first announced, Apple proudly proclaimed on the relevant page that developers distributing their apps outside of the Mac App Store would be able to get a “free Developer ID certificate”.

Unfortunately, I did not have the foresight to screenshot the page that said this, because now, even a month after the release of Mountain Lion, their generosity appears to have evaporated.

Only Mac Developer Program members are eligible to request Developer ID certificates and sign applications or installer packages using them.

The aforementioned Developer Program(me) is the standard, $99/£69 per year subscription that entitles you to full Mac App Store distribution rights. Unless I am missing something obvious, and I really wish that I am, there are no free Developer ID certificates.

This disappoints me — I cannot justify enrolment in the paid program for DfontSplitter for Mac, which doesn’t generate me significant donation revenue at all. This means I cannot sign DfontSplitter for use with Gatekeeper, which degrades the experience for Mountain Lion users of the software, and maybe even puts them off entirely.

I am definitely in favour of security measures that put the control in the hands of the user. I cannot, however, get behind a system which appears to discriminate against all developers who are not in a position to join Apple’s certification programme. I am left disappointed, and my app is left unsigned.

Photo is Barbed Wire Twilight, by Orin Zebest. Licensed under CC-BY 2.0 GB.

Moving to Mountain Lion and Beyond

Mountain Lion pre-release logo

In my most recent article for For Mac Eyes Only, I ponder the implications of the remarkably speedy scheduled release of Apple’s OS X Mountain Lion on the longer term viability of older Mac hardware. Mountain Lion is due to arrive just a year after the release of Lion.

We now await OS X 10.8, Mountain Lion. Scheduled to be released a mere year after Lion, we are promised even more features ‘inspired by iPad’.

Wait a second. What was that? It is due to arrive this summer. Just one year after Lion was released.

A new release of OS X hasn’t come so quickly since the operating system was very young and was still being established and stabilised.

This strikes me as quite a shift, and it brings me to an important issue — how does this affect the lifespans of the Apple products we buy?

You can read the full article over on the For Mac Eyes Only site.

How to Completely Disable Java on Mac OS X Lion

The security landscape for Mac OS X is changing. It has been for some time, but every now and then, an event comes along that highlights it.

I am thoroughly disappointed with how tardy Apple can be with releasing security updates. Java has been one of the components most visibly neglected in terms of timely patches. The recent ‘Flashback’ trojan for OS X exploited old, well-known vulnerabilities in Java that Apple had failed to promptly patch.

Java on Lion is deprecated, and is no longer installed by default. However, some upgrades from Snow Leopard bring Java along with them, and some users have manually installed Java for compatibility with certain applications.

If you do not know that you need Java installed on your system, do not install it. That is the best way to mitigate any security threat that would try to leverage a Java vulnerability to get into your system.

On Lion, however, once Java is installed, it does not seem to be possible to completely remove it.

What you can do is change the permissions on the relevant files so that it is ‘neutered’ and cannot run at all.

How to Completely Disable Java for Lion

I don᾿t recommend you disable Java on Snow Leopard. It is part of the operating system there, not an optional add-on component. I have not tried this process on Snow Leopard. Proceed to disable Java like this at your own risk (even on Lion)!

While logged in as an administrator user, open Terminal from Applications > Utilities.

Type the following commands in, pressing Enter after each one. You might be asked for your password.

sudo chmod 000 /System/Library/Java/JavaVirtualMachines/
sudo chmod 000 /Library/Java/JavaVirtualMachines

What these commands do is change the permissions mode to 000 on these Java files, meaning that no users have any permissions to even enter these folders, let alone read any files in them. This stops Java from running.

You can test that it is working, or, rather, not working, by now attempting to load Java Preferences in Applications > Utilities. You should be told that Java is not installed, and invited to install it. Click Not Now.

OS X offering to install a Java runtime

Re-enabling Java

If you suddenly find that actually you do need Java again, simply run the same commands in Terminal, but with the permissions mode 755 (the folder’s owner can read, write, and enter the directory, and everyone else can just read and enter the directory).

sudo chmod 755 System/Library/Java/JavaVirtualMachines/
sudo chmod 755 /Library/Java/JavaVirtualMachines

It should spring back into life!

Infected?

If you were unfortunate enough to be infected by Flashback (even if you did not type the Administrator password when it prompted), F-Secure has some instructions on its detection and removal. (Hat tip to @bldngnerd.)

Set Up Public Key Authentication for SSH on the Mac

Thanks to a great suggestion by Nick Charlton, I decided to put together a screencast demonstrating how to set up public key authentication for logging into SSH servers on the Mac.

Setting up a keypair and then using it to log in to remote systems, instead of remembering separate usernames and passwords, can be a bit of a fiddly business, but I hope that in this screencast I can show how to get it set up.

Set Up Public Key Authentication for SSH on the Mac from Peter Upfold on Vimeo.

Take a look and let me know what you think!

Find this tutorial useful?


Going Pro

IMG_2329

Yesterday my brand new MacBook Pro 15″ arrived.

I got my original white MacBook over two years ago and it quickly became my primary machine. The seamlessness of the Apple hardware-software connection, its increased performance over my existing Linux PC and the desire to learn about OS X motivated this. Since then it has been, for the most part, my primary computer.

The MacBook still is an excellent machine for what it does, but being a full-time desktop as well as a portable computer, I began to desire a larger screen for when I’m using it at the desk and to get away from the limitation of the rather pathetic Intel GMA 950 integrated graphics.

So to address these issues and erm… continue my investment into computing (nothing to do with the fact that the new Pros are just, really, nice) I went out and bought the new 15″ MacBook Pro.

I got the middle model, with a 2.66 GHz Intel Core 2 Duo, 4GB RAM and the dual GPU Nvidia GeForce 9400M (for battery life) and Nvidia GeForce 9600M GT 512 MB (for performance).

I’ve had it just hours, but I love this machine!

IMG_2336

» Read the rest of this post…

iPod Touch unboxing

Here are some photos from the unboxing of my iPod Touch. I’ve had it for a few days now, and I am absolutely loving it thus far.

Strangely though, I don’t really feel like jailbreaking it and messing around with it at the moment. Whether I’ll stick with that attitude and wait until February, considering it’s not long now, or whether I’ll change my mind will yet to be seen, I guess.

In the meantime, enjoy the photos below, or view the full set on my Flickr.

» Read the rest of this post…