Skip to content

Blog

Accessing Resources via Private Endpoint in Azure Hub-and-Spoke Virtual Network with Basic SKU VPN Gateway

In this blog post, we’ll be:

  • configuring a virtual network topology in Azure in the “hub and spoke model”
  • deploying an example resource (a Key Vault) in our spoke network
    • restricting access to the Key Vault using a private endpoint connection so that it is only accessible inside the vnet
  • configuring a DNS forwarder running Debian + Unbound in the hub network for resolving the private DNS name of the Key Vault
  • configuring a Basic SKU Virtual Network Gateway
  • configuring a Windows client to connect to the Basic VPN Gateway in a point-to-site configuration so it has access to the Key Vault through the private endpoint

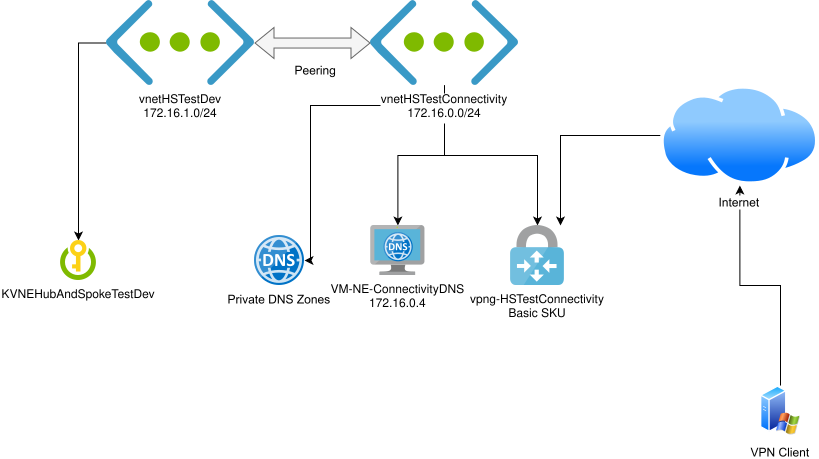
Diagram of the architecture. A key vault, KVNEHubAndSpokeTest, is at the left of the diagram, connected to a virtual network vnetHSTestDev (172.16.1.0/24). This is peered with vnetHSTestConnectivity (172.16.0.0/24). This vnet contains private DNS zones, a virtual machine VM-NE-ConnectivityDNS (172.16.0.4), and the basic SKU virtual network gateway, vpng-HSTestConnectivity. On the right, the internet, and a VPN client connected through it. The VPN client has a line connecting it, via the internet, to the VPN gateway

Why?

A hub and spoke network with private endpoints for restricting access to various Azure PaaS resources is a fairly common architecture, but there are a few parts of it that lead to unnecessary costs: namely the PaaS private DNS resolver and the Virtual Network Gateway in its non-Basic SKUs, such as VpnGw1.

The primary purpose of this post is to document how I’ve achieved this architecture using the Virtual Network Gateway Basic SKU, which saves ~£80/month over the VpnGw1 SKU. It also saves the PaaS private DNS resolver costs by using a lightweight VM.

Create hub network

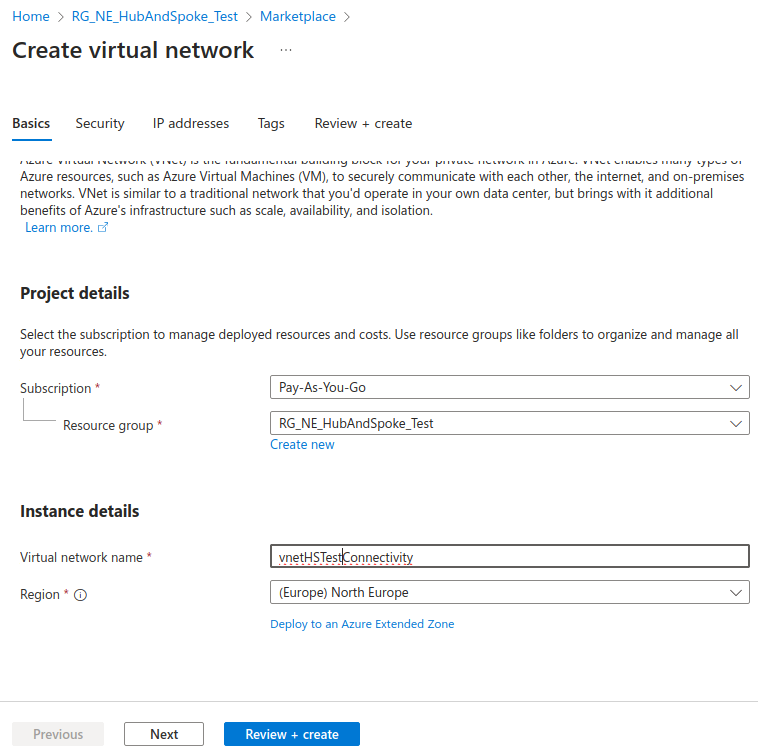
We’ll start by creating our “hub” network, called vnetHSTestConnectivity in my case.

Create virtual network screen. The virtual network name is vnetHSTestConnectivity

We’ll be using the 172.16.0.0/24 range for this network.

» Read the rest of this post…

“Could not import package. Warning SQL72012 / Error SQL72014” when importing a .bacpac from a blob

Azure SQL Database’s point in time restore and long term retention are solid backup options, of which you’d have every reasonable expectation for a PaaS service!

However, Microsoft’s documentation is abundantly clear that, at the time of writing, there is no support for immutable backups via this method.

"Configure backups as immutable" stated as "not supported" for Azure SQL in a table on Microsoft's documentation site

If you actually need to achieve immutable backup storage for Azure SQL database, you’ll need a different approach.

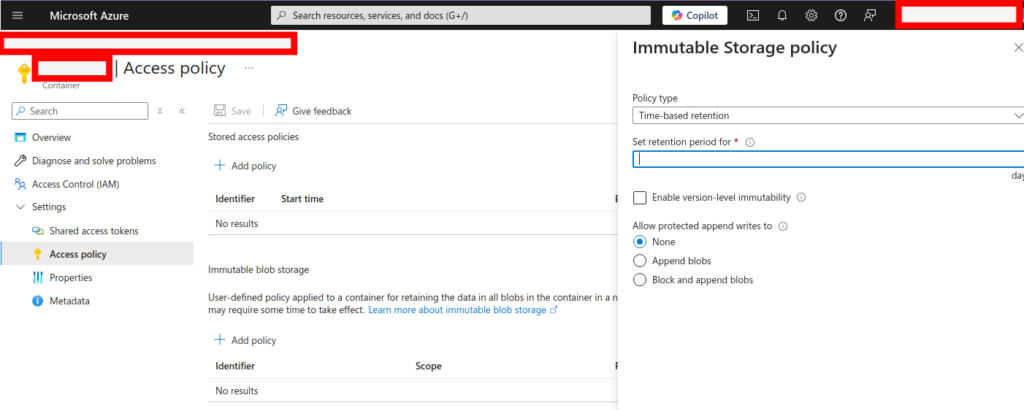
The Export button within Azure SQL Database can be used to export a .bacpac file. If this is stored in a storage account with immutability locked, you have a copy of your data that will be resilient, even to a Global Administrator compromise.

Microsoft Azure Portal -- the Access policy page for a blob container, showing the immutable blob storage options

With regard to .bacpac exports, Microsoft helpfully reminds us that:

BACPACs are not intended to be used for backup and restore operations. Azure automatically creates backups for every user database. For details, see business continuity overview and Automated backups in Azure SQL Database or Automated backups in Azure SQL Managed Instance.

However, that leads me right back to “immutability is not supported” point regarding the backups they’re mentioning here. It seems remarkable that “business continuity” is mentioned in the context of backups that are very vulnerable in many BCP scenarios, given the world of ransomware we face today (and will face in the future!)

A .bacpac file held in immutable storage can be imported back into a new Azure SQL database to restore it, but it’s important to note Microsoft’s warning:

For an export to be transactionally consistent, you must ensure either that no write activity is occurring during the export, or that you’re exporting from a transactionally consistent copy of your database.

This is indeed critical. A copy can be made simply with the Copy button within Azure SQL Database. Once complete, press Export on the copy of the database. You can delete the copied database once the export is complete.

The truncated error message I received (and the reason for this blog post) when trying to import a .bacpac that was not transactionally consistent is as follows:

The ImportExport operation with Request Id failed due to 'Could not import package. Warning SQL72012: The object [data_0] exists in the target, but it will not be dropped even though you selected the 'Generate drop statements for objects that are in the target database but that are not in the source' check box. Warning SQL72012: The object [log] exists in the target, but it will not be dropped even though you selected the 'Generate drop statements for objects that are in the target database but that are not in the source' check box. Error SQL72014: Framework Mi'.

If you see this, you’ll need to export a copy of the database, as above, so that no transactions are occurring on that database copy for the duration of the export operation.

Office will not find Current Channel (Preview) or Beta updates

If you have at some point enabled Microsoft’s Cloud Update in the Microsoft 365 Apps admin center, and later want to update a device managed in this way to Current Channel (Preview) or the beta channel, you may find yourself tearing your hair out wondering why a separate Group Policy/Intune/registry based instruction to switch to a different channel doesn’t work immediately. Or perhaps why you can’t quickly take a machine out of cloud update control, or indeed deploy the preview channels via the cloud update mechanism!

To be fair, Cloud Update taking precedence and causing other policies to be ignore is documented, although how to override this if you do need to wrestle control back from the Cloud Updates is buried a little in Microsoft’s document.

I had a test machine that was enrolled in the Cloud Update, but I now needed to be on Current Channel (Preview), so I couldn’t have it be controlled by Cloud Update anymore, as these preview channels aren’t an option in that portal. The test machine was added to the scope of an Intune Configuration Profile which set the update channel via Administrative Templates.

A simple check for updates in any Office app happily informed me I was already up to date. 🙁

I could get the device on the beta channel by running officesetup.exe /configure <xml>, with an XML file as follows:

<Configuration>
<Updates Channel="BetaChannel" />
</Configuration>

However, this wouldn’t stick – the next Office update would roll it right back to Current Channel.

I excluded an Entra ID group containing the primary user and the device from Cloud Update, but this didn’t help immediately. I didn’t have 24 hours available to me to wait for the exclusion to take effect.

Screenshot of Microsoft 365 apps admin center, showing "Updates Overview", where in "Tenant Settings" you can set an exclusion group

In Tenant Settings, you can exclude a group from cloud update management, but it may take some “cloud time” to apply!

It turns out that once in Cloud Update, if we want to force Cloud Update off without waiting for the machine to drop out of the inventory, we must set this registry value:

HKEY_LOCAL_MACHINE\SOFTWARE\Policies\Microsoft\cloud\office\16.0\Common\officeupdate

Value: ignoregpo, Type: DWORD, Value data: 0

Windows Registry Editor, with ignoregpo = 0 highlighted, in the pathHKEY_LOCAL_MACHINE\SOFTWARE\Policies\Microsoft\cloud\office\16.0\Common\officeupdate

Change ignoregpo from 1 to 0 here!

Now, the updates setting from HKEY_LOCAL_MACHINE\SOFTWARE\Policies\Microsoft\office will actually be honoured, and an update check should find the right channel!


Sentinel KQL Queries: Detecting a Lack of Zscaler Data Ingestion

Screenshot of the "PIU - No Zscaler Internet Access data received in 2 hours" Sentinel rule in situ in the Azure Portal.

Ingesting data from Zscaler Internet Access and Zscaler Private Access into a SIEM is a valuable technique for identifying risky endpoint activity or system compromise. It also gives you a (hopefully) immutable1 copy of this audit data to support a post-incident investigation.

I’ve been able to configure both Zscaler Internet Access and Zscaler Private Access data to be ingested into Microsoft Sentinel2, but occasionally have found that the somewhat circuitous path that ZIA data takes into the SIEM (NSS VM, to another Linux VM over syslog, then to Azure Monitor Agent, and finally to Sentinel) can be brittle. A reboot of the collector VMs has always fixed this, but you have to know that the data flow has stopped!

I have written a couple of KQL queries for this scenario – one for Zscaler Internet Access (ZIA) and one for Zscaler Private Access (ZPA).

Each will trigger an incident if zero log entries are received for the relevant service within a 2 hour period.

You can import these to your own Sentinel environment by clicking Import in Analytics rules and providing the ARM template files linked below.

Zscaler Internet Access

Download as ARM template

CommonSecurityLog | where DeviceVendor == "Zscaler" and DeviceProduct == "NSSWeblog"
| where TimeGenerated > ago(30d)
| summarize last_log = datetime_diff("second",now(), max(TimeGenerated))
| where last_log >= 7200

Set this to run against data for the last 2 hours, with the maximum “look back” period. The query will return 0 results if data ingestion is occurring correctly, so you will want to alert on >0 log entries.

Zscaler Private Access

Download as ARM template

ZPAUserActivity
| where LogTimestamp > ago(30d)
| summarize last_log = datetime_diff("second",now(), max(LogTimestamp))
| where last_log >= 7200

Set this to run against data for the last 2 hours, with the maximum “look back” period.

You will get an error “Failed to run the analytics rule query. One of the tables does not exist” if you have not completely configured the ZPA log ingestion, including adding the custom ZPAUserActivity function to your Sentinel workspace. Follow the Zscaler and Microsoft Sentinel Deployment Guide (“Configuring NSS VM-Based Log Ingestion for ZPA”, page 126).


1: The keys to the kingdom are then the Sentinel/LA workspace, which hopefully your attacker has not escalated privileges to be able to delete. There’s nothing like “immutable vaults” in Azure Recovery Vaults for Sentinel or Log Analytics workspaces. You can set a standard Azure lock, but a privileged attacker could just delete the lock!

2: Zscaler recently (just in time) updated the ZPA ingestion workflow to use the Azure Monitor Agent rather than the deprecated Log Analytics Agent. This took a little reconfiguring and was quite an involved process!

Word hangs on saving: App Control for Business and WebClnt.dll

The Symptom

Users were experiencing a 5-15 second delay when saving a document to OneDrive or SharePoint, during which Word would show as “not responding”.

All machines in question use App Control for Business (WDAC).

The Cause

During the “not responding” period, Word is attempting to start the Web Client service, which is set to Manual.

svchost.exe launches, tries to load the WebClnt.dll library, but this is blocked by App Control for Business.

Word has to wait for this attempt to time out, before then giving up and saving anyway.

The Fix

Setting the Web Client service start type to Disabled prevents Word from attempting to start the service, fixing the delay.

The Diagnosis Process

Event Tracing for Windows and UIforETW strike again, along with the incredible utility of the public symbols for Office.

The process was similar to that which I documented here, where the process of saving comments in Word caused a hang. The key is to click Trace > Load Symbols to ensure we have function names in the trace.

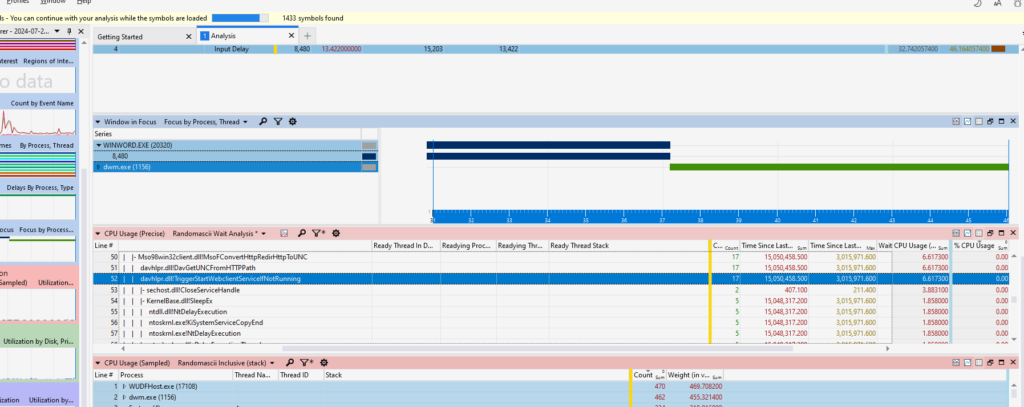
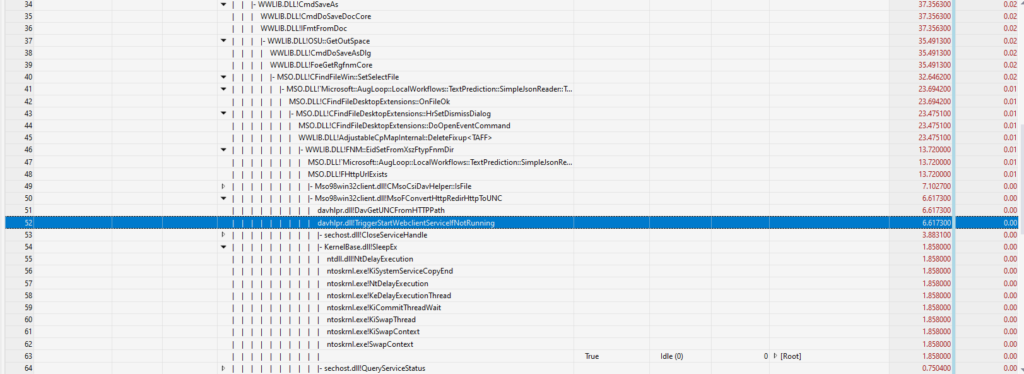
Drilling down to the problem time area and then digging into the amount of time we spend in each function revealed that the time was being spent in davhlpr.dll!TriggerStartWebclientServiceIfNotRunning.

A screenshot of Windows Performance Analyzer, showing a stack trace where a significant wait was being incurred in davhlpr.dll!TriggerWebClientServiceIfNotRunning

Stack trace from Windows Performance Analyzer from WWLIB.DLL!CmdSaveAs to davhlpr.dll!TriggerStartWebclientServiceIfNotRunning

Well this does indeed sound like something to do with the Web Client service!

» Read the rest of this post…

Adventures with Arch Packages: Exercise Caution with Exclude

Running a bleeding-edge rolling release Linux distribution like Arch Linux has its challenges and risks, but there is perhaps no greater feeling of absolute control over your own operating system! It also leads to the opportunity to have “adventures” like the one described here. While “adventure” might be tongue-in-cheek, the truth is that there is great educational value in breaking something and thus being forced to fix it!

I recently made the mistake of seeing that a pacman upgrade to icu (International Components for Unicode) would break a few Electron packages, which I needed for the open source build of VS Code, among a few other options. (I generally like to avoid Electron apps, but VS Code is a rare exception!)

I was notified by pacman that there was a dependency issue here that could not be solved, so that the entire transaction was not possible.

My mistake was thinking “oh, I’ll just exclude icu from the upgrade, as it’s causing the dependency issue”. Usually these issues are fixed in a day or two, so I’d upgrade it later.

This was indeed a mistake.

Somehow, apps were now referencing the new icu that wasn’t there already. I rebooted, to discover that the GUI wouldn’t start, and I couldn’t even use pacman in single-user mode to roll back the previous transaction, as pacman itself depended upon icu.

I’d broken the very package manager that I needed to roll back. Oops!

Install media to the rescue

I booted into the Arch install media, and set about to address the issue.

chrooting into the target filesystem and using pacman wasn’t an option, as running the package manager from the target filesystem failed with the same dependency issue.

I had a few false starts with trying to run pacman from the install medium, pointing it at the mounted OS partition with --sysroot.

While this didn’t pan out, I remembered that pacstrap, while designed for install-time, presumably could install packages in the target filesystem without needing pacman itself. I was concerned that this might reinstall some base packages, but it turns out you can specify which packages to install manually on its command line.

So, I gathered the list of packages that needed upgrading by using pacman -Syu --sysroot /mnt against the target filesystem, and then supplied this package list to pacstrap:
pacstrap -G -i -M /mnt icu brltty electron27 electron28 electron29 electron30 freerdp freerdp2 harfbuzz-icu raptor
And… we’re back!

Lessons learned

  • The manual isn’t joking about “Partial upgrades are unsupported”.
  • Considerable caution is required when using pacman --exclude
  • “The OS is ephemeral and I can rebuild it” is a bit too relaxed an attitude when you don’t really want to have to rebuild the OS at short notice. Back up the OS packages and libraries too.
  • Really understanding the package manager and install process gives you the tools to pull yourself out of the holes you dig for yourself!

 

Reminding myself which machine I am authenticating to with a sudo “lecture”

I frequently SSH into various systems from my primary Linux machine. There is an analogous issue to “too many browser tabs” that exists here — having too many SSH sessions open in different terminal tabs!

There is a risk in these cases of accidentally typing a higher-privileged sudo password into a lower security system by typing into the wrong terminal. There are various approaches that can help here; I have used screen banners with different colours before.

A good “last line of defence” approach to this risk that I have settled on is to make use of sudo‘s “lectures”. You will have seen the default:

We trust you have received the usual lecture from the local System Administrator. It usually boils down to these three things:
#1) Respect the privacy of others.
#2) Think before you type.
#3) With great power comes great responsibility.

We can customise this, and also set it to always show, rather than just the first time you ever use sudo on that machine. We’ll create a custom lecture file with our desired text — in my case, the hostname I’m logged into, so I’m sure where I am before I type the password!

Then, use visudo to set these options:

Defaults lecture=always
Defaults lecture_file=/etc/custom_sudo_lecture

Installing the Zabbix Agent 2 on Windows with Minimal Privileges (LocalService)

The Zabbix Agent 2 on Linux uses a non-root account by default (“zabbix”), and thus provides some protection against the worst outcomes of a potential vulnerability in the agent, or perhaps a takeover of a Zabbix server that monitors that agent.

The Agent on Windows, however, runs with NT AUTHORITY\SYSTEM, which has extensive privileges on the monitored system.

I have put together a little wrapper script around the Zabbix Agent 2 MSI installer which runs the installer, then reconfigures it to run as NT AUTHORITY\LocalService, which is a minimally privileged account.

You can find the script on GitHub. You’ll need to also grab the Zabbix Agent 2 MSI installer, rename it to zabbix-agent2.msi and provide that MSI in the same directory when you deploy.

It goes without saying that this is not officially supported, but I have not experienced any issues monitoring the standard items that are in the Windows by Zabbix Agent template. It is possible you will run into issues with unsupported items if the item in question does in fact require elevated permissions on the monitored host!

Hopefully this will be useful to others looking to monitor Windows systems with Zabbix, while maintaining as much of the principle of least privilege as possible!

Choppy video and audio in KVM VMs with Spice Display

I am currently trying to migrate away from VMware Workstation on a Linux host (thanks, Broadcom!) to using KVM virtual machines.

I run many Linux virtual machines, and in many of these I use the GUI, so want well performing video and sound! This was one of the original justifications for VMware Workstation.

The default configuration on Arch was to use the Virtio video driver and a “Display Spice” entry in the VM configuration to support video and sound output.

However, I would experience choppy audio and video output. On the display, it seemed that, roughly vertically, some of the pixels in the framebuffer would not be updated, especially when lots of display changes occurred. This created a sort of irregular “interlaced” look, as you can see here as I have moved the mouse down the menu:

Debian 12 XFCE desktop, with an irregular "interlaced" graphical corruption issue, showing a menu where previously highlighted menu items are partially blue from previous frames

I have been able to work around this issue by enabling OpenGL acceleration in the guest.

Configuration

For an Arch guest, it needs the package qemu-hw-display-virtio-gpu installed.

Check the guest is showing the virtio_gpudrmfb frame buffer device:

# dmesg | grep '\[drm'
...
virtio-pci 0000:00:01.0: [drm] fb0: virtio_gpudrmfb frame buffer device

The guest configuration is as follows:

3D acceleration enabled in the Video Virtio driver. Ensure this is ticked.

virt-manager configuration page on the Video Virtio tab. Video model is Virtio. 3D acceleration should be ticked.

On the Display Spice object, the configuration is set to Listen type None and OpenGL is set to on.

virt-manager configuration page on the Display Spice tab. Listen type is None and OpenGL is ticked.

References

The idea that enabling OpenGL with the virtio video driver may help was derived from https://www.kraxel.org/blog/2016/09/using-virtio-gpu-with-libvirt-and-spice/.

Adventures in ETW: “Slow Comment”

I am a great admirer of the work of Bruce Dawson on Event Tracing for Windows, UIforETW and his blog posts on using ETW to track down all sorts of weird and wonderful issues.

I also found Bruce’s training videos on the subject, despite the videos knocking on the door of being a decade old, to be very useful.

I was delighted to have a recent opportunity to practise my own skills in this area, following Bruce’s lead!

The Symptom

The end user was experiencing delays of between several seconds and about half a minute when saving comments in a Word document. Choosing to Insert the comment was fine and when typing the comment, Word also behaved normally. Press Save, however, and Word’s UI would hang for somewhere between a few and 30 seconds.

Yep, sometimes half a minute for each comment being saved!

In a document that required a lot of comments, this was dramatically slowing the user’s work.

» Read the rest of this post…