Skip to content

Blog

A random nugget of Mac information

Sorry about the lack of posting here, I’ve been mighty busy here working on other blogs I contribute too and plently of other stuff too.

Today I want to share a random bit of Mac trivia that I noticed. Be warned, it is really quite random, but it’s also pretty cool.

It’s a few ways to tell whether a Mac application is a Cocoa application or not, by looking at very subtle differences in how they work.

First of all, this is a nice easy way to discover whether something’s a Cocoa app. It works in all applications that use Cmd-M as the keyboard shortcut to minimise a window. Focus a window of your target application and press Cmd-M.

Watch the amber traffic light carefully as it minimises. If you can see the little minus sign in the traffic light as it minimises, then it is a Cocoa app. You must press Cmd-M, not just click the button, otherwise it won’t work.

Let’s take a look. In Safari, a Cocoa app, you can see the minus sign as it minimises:

Safari = Cocoa

But in Firefox, not a Cocoa app, nothing is visible:

Firefox = not Cocoa

You wouldn’t believe how difficult it was to get those screenshots in mid-minimise by the way. πŸ˜‰

Anyway, that is basically it. From that you can tell whether or not an app is built with Cocoa. As far as I know, it’s pretty accurate, but let me know if it’s wrong at all.

There’s also another one. If your target application has a show/hide toolbar toggle button, click it. If the animation is smooth, it’s Cocoa. If there is no animation and it just switches, it’s likely to not be Cocoa.

Just thought I’d share that with everybody. Because I notice strange subtle details like that.

MacFUSE and SSHFS

One of the things I love about KDE, my primary Linux desktop environment, is a technology called KIOSlaves. When you’re using it to connect to a remote server over SSH with SFTP for example, all your KDE applications can access files on that remote system exactly as if it was a local disk.

Now that I’m using Mac OS X a fair bit of the time too, I wanted to duplicate this kind of functionality (using OS X’s native applications and not KDE ones running under the operating system).

Thankfully, MacFUSE and SSHFS solve this problem, by allowing you to mount a remote server (using SSH file transfer) as a volume in the Finder. Just like with KIOSlaves, all your Mac apps (and even non-native ones) can read and write over the network as if it was a local file.

So, here’s a quick primer on how to install it.

Head over to the MacFUSE Google Code page and go ahead and download the MacFUSE Core package (at the time of writing, version 0.2.2).

Open up the disk image and run the installer by double-clicking the pkg file.

MacFUSE DMG

You will need to reboot after installation, as MacFUSE adds a kernel extension (don’t worry though, it’s all free/open source under the BSD licence so there should be no nasty stuff, hopefully).

Once you’ve rebooted, head back to the Google Code page and go to downloads. Grab yourself the latest version of sshfs (right now, that’s 0.1.0).

Once again, open up the disk image. This time, just drag the application to your /Applications folder (or wherever you want).

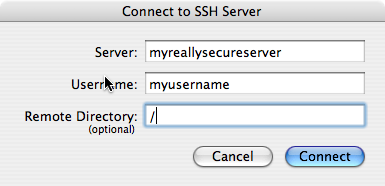
Now, run the application and fill in your details. Click Connect and a couple of seconds later, you’ll need to enter your password (or key passphrase). Finally, your mounted SSH drive should appear on the desktop and in the Finder (make sure your Finder preferences are set to show ‘Connected servers’).

SSHFS window

And that’s it! You can hack away over SSH with full application integration. When you’re done, simply eject the network drive like you would any other and you will be safely disconnected.

It’s actually really awesome – and surprisingly easy. A couple of caveats you need to be aware of, however:

  • While this doesn’t happen for me, you might end up accidentally planting loads of OS X metadata all over your remote filesystem. As I say, I don’t experience this behaviour in the many times I’ve used it, but beware of this possibility before your friends start asking you why you’ve just littered every directory with a .DS_Store file. πŸ˜›
  • File sizes are not reported correctly by sshfs. Do not believe what it says.
  • If you run SSH on a non-standard port for anti-cracker reasons (very good idea, by the way), the GUI client to connect won’t work. However, you can use the command line client to initiate the connection. From there on, it works just as advertised.
  • All of this is pre-release software. Worked for me, but YMMV.

It’s awesome, though. πŸ˜€

My first ever OS X upgrade

Apple just released Mac OS X 10.4.9, and this marks my first ever Mac OS upgrade! What a milestone!

Apple today released Mac OS X 10.4.9 via its Software Update utility and on the Web. Apple says: ΓƒΒ’Γ’β€šΒ¬Γ…β€œThe 10.4.9 Update is recommended for PowerPC and Intel-based Mac computers currently running Mac OS X Tiger version 10.4.8 and includes general operating system fixes, as well as specific fixes or compatibility updates for the following applications and technologies: RAW support; handling of large or malformed images that could cause crashes; image capture performance; mouse and keyboard shortcuts: font handling; playback quality, and bookmarks in DVD Player; USB video conferencing cameras for use with iChat; Bluetooth devices; browsing AFP servers; Apple USB Modem; Windows digital certificates; Open and Print dialogs in applications that use Rosetta on Intel-based Macs; time zone and daylight saving for 2006 and 2007; and security updates.

Bearing in mind the last update to Panther was 10.3.9, does this mean Leopard is pretty soon? Or will they flow over to 10.4.10?

I’m downloading it right now (10.4.9, not Leopard, unfortunately).

Backing up your Mac’s /Users folder

Just finishing off my first ever backup of my MacBook. I’ve made a complete copy of the /Users folder, which should back up all the files and preferences of all the users on the computer.

Just for reference, and to show how I’m doing it, I’ll walk you through how I’m doing my backup.

I’m backing up to an external 200 GB hard drive, onto a partition formatted with NTFS. Thanks to MacFUSE and the NTFS 3G projects, I can safely write to the drive easily. I’m not going to cover how to install them here, so I’ll just assume you’re using some kind of external storage already set up for writing use on your Mac.

Now, we could just copy the files onto the storage medium in the Finder, but unless your removable disk is formatted with OS X’s native file system, you’ll lose Mac-specific metadata. While that’s not usually vital, it’s always better to preserve the original information and for that reason we’re going to make a disk image file (yes, like those .dmg files you download) in which to store our backups. Storing the files inside the DMG makes a mini filesystem-in-a-file which is formatted with HFS+ (the native format), so we keep all that extra information.

» Read the rest of this post…

Interesting thing

Sorry, another Mac post. Please skip over this if you’re not interested – things will return to a normal level once the novelty has worn off, I promise. πŸ™‚

On OS X, make a file. Doesn’t matter what, just type some random stuff into TextEdit and save it as test.rtf in your home folder. Now load the terminal up:

$ mv test.rtf test:file.rtf

Now look in the Finder. It will be called test/file.rtf. But that’s not what we called it!!

HFS+ (the filesystem) uses colons (:) as directory separators, but Unix uses the forward slash (/). The Unix underneath OS X can’t handle a file with a / in the name, but HFS+ can’t handle a file with a : in the name.

So Mac OS X swaps them around when necessary.

Clever, huh?

Anti-aliasing in Mac OS X’s Terminal

Under Mac OS X, fonts everywhere look much crisper, cleaner and more refined I’ve found than on any other platform – even when it’s the same font. I don’t know what Apple are doing, but it’s good.

The one exception to that is Terminal. For some reason, out of the box, the fonts are configured without anti-aliasing, so for someone like me that spends a lot of time with the BSD underneath all the Aqua, it’s a bit annoying.

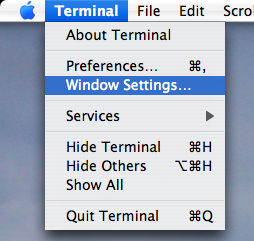
You won’t find the option when looking in Terminal’s Fonts panel (Command-T), but the functionality is still there, it’s just rather hidden.

Terminal menu

From the Terminal menu, choose Window Settings. Pick Display in the pop-up menu and tick Anti-aliasing. Click Use Settings As Defaults and you should from now on have a nice, smoothed, Terminal experience.

Terminal Inspector

Ah, that’s better. Now everything is just fine. πŸ™‚

Cut the PPC part out of Mac apps

Universal binary applications on Mac OS X are great, because it means they run natively on both older PowerPC Macs and newer Intel Macs natively.

The bad thing about them is that they take up a lot of disc space, because they contain both the PowerPC code and the Intel code.

There’s actually a shareware app called Xslimmer that will strip the PPC binary out of your applications and slim them down, but I just discovered that you don’t need it. The functionality to do this is built right in to Mac OS X.

First of all, make a backup copy of any application you want to mess around with here. Just in case. πŸ™‚

Now head to the Terminal and do the following (in this example, I use Camino, so substitute in the name of the app you’re using):

$ lipo -thin i386 /Applications/Camino.app/Contents/MacOS/Camino -output temp
$ rm /Applications/Camino.app/Contents/MacOS/Camino
$ mv temp /Applications/Camino.app/Contents/MacOS/Camino

If you now do a Get Info on the app, you should see the kind will be Application (Intel). It should run fine and save you a bit of disc space!

In theory this also works the other way round, by using -thin ppc, but I haven’t tried it.

Dual monitor

Not very practical given the size difference (13″ vs 19″), but still awesomely cool to do.

Dual monitorDual monitor Hosted on Zooomr

KDE on Mac OS X

Just installed KDE on my brand, shiny new MacBook. I got 2 GB worth of KDE goodness (the ‘everything’ torrent) from here and simply opened up the disk image and launched kde4.mpkg.

Konqueror runs and works reasonably well as a web browser – but sadly crashes when trying to use it as a file manager (and I’m not after the web browsing portion).

Installing KDE on OS X

Installing…

Konqueror on OS X

Running…

Konqueror crashed!

And crashing… πŸ™‚

I do have a whole host of other KDE apps on Mac OS X to play with and of course much more stuff to do natively too!

OS X is awesome. All the marketing stuff about ‘working out of the box’ is actually surprisingly true. After running the initial “I’m going to ask you millions of questions” setup assistant, you fly straight into a ready-to-run system. Maybe it’s just I’ve never had a decent Windows OEM setup before (is there such a thing?), but Apple get the OOBE right.

It’s here!!