Skip to content

Blog

I’m working on the site

Just downloading a working copy of my website right now.

Here are the things I’m going to try and tackle:

  • WebKit navbar rendering bugs
  • Getting my Google Reader shared items back

Wish me luck with the first one, as my CSS skills aren’t mindblowing.

I also have no idea how far I’ll get, but I’ll report back here if/when there are any changes.

My first ever WordPress plugin – Preview In A New Window

Just wrote my first ever WordPress plugin. 😀

A while back I wrote about using the preview in WordPress when writing long posts and how to open it in a new window or tab.

Well, this plugin creates a handy link that you can use to do just that – one click to open a preview of your post in a new window. It only works after you’ve pressed the Save and Continue Editing button at least once, as WP doesn’t generate a preview before that. Every time you save the post after that, you’ll need to reload the window/tab containing your preview to keep it up-to-date.

Download it here.

It’s not much, but it’s a start.

By the way, this is pretty hacky too. 🙂

Things left to do on the new design

While it’s pretty much done, there are a few things left I need to address:

  • Get WPGet’s Ajax comment preview re-enabled (I need to restyle it for the new look first!)
  • Fix the weird WebKit rendering bugs
  • ‘Block the links’ on the navbar instead of using JavaScript (teach me how!! 😛 )
  • Find somewhere to put my Google Reader shared items (you might have noticed, they disappeared because I now have only one sidebar!).
  • Rid the world of Internet Explorer. Oops – no, that’s next year. Hey – for the most part, the new design works in IE, so don’t complain.

UPDATE: forgot this one – make a proper secondary navbar for the projects page. 🙂

New design

Hello everyone. In case you’re reading in a feed reader, click through now.

You’ve probably just noticed that there’s been a bit of a change. “What, where’s the orange?”. Let me tell you a story.

This morning, I woke up and I had an idea. I knew what I wanted my site to look like in the future. So I rushed onto the computer, launched The GIMP and did a quick mock-up of how the header image for a future revision of the site might look. I decided it looked awesome, so I saved it.

Then I wondered “hmmm – I wonder what this header image looks like if I put it in a veryplaintxt theme?”. So I got the local copy of my blog on my MacBook, installed veryplaintxt and put in my header image.

I then got really inspired and started a marathon CSS hacking session (the style kind, not the DVD kind), so I whipped through veryplaintxt’s CSS and designing my new blog style.

Interrupted between a random 16-mile, 2 hour cycle ride, I worked on the CSS all day (bearing in mind I’m not all that good at CSS) and finally, I integrated my static pages with the new style too.

By that time, I liked it so much I wanted to put it on the site, make it go live, today. Actually, it came close to not going live today, due to an incident involving Mac OS X’s Finder overwriting and not merging directories, but I don’t want to relive that moment.

If you visited the site in the last hour or so, you will have been greeted by a nice page telling you a new design is coming. Well, here it is.

I’m really happy with how it’s come out. The Blogger-era orange from those days is now long gone, and has been replaced with a nice white/red/blue look. The design looks and feels cleaner (and is – the code is now a lot better than it used to be). I just hope my readers like it as much as I do!

Thanks to veryplaintxt, which was the base style that I worked from to make my theme and of course two of the best operating systems in the world. 😛 And the Konqueror, Cyberduck and Smultron projects for allowing me to upload, erm – upload, and code my new theme.

By the way, what do you think? Please do let me know your suggestions, praise, complaints and all other feedback via the comments.

At the current time, I’m aware of a few minor issues with the design, including strange navbar rendering under WebKit (but not KHTML) and a couple of pixels being off here and there, as well as some minor IE bugs. I’ll keep you posted as to when I have ironed these out. If you see any other rendering bugs, let me know please!

My amazing web server backup script

For my own server setup on my machine, I’ve just finished a better version of my automated backup script.

It backs up everything in the Apache document root, all my virtual hosts directories and also does a MySQL dump, before saving all three of those files (date in the filename) in a specified directory. But it gets better – it also copies the backups to another location (on a different physical disk) for redundancy. It also automatically prunes out old backups and deletes them (you set a specified number of backups that you want to keep in each folder).

It runs daily automatically via cron on my machine.

And I think it’s quite good and I thought it might come in handy as a base for someone else’s script.

#!/bin/bash

DATE1=`date | awk '{print $3}'`
DATE2=`date | awk '{print $2}'`
DATE3=`date | awk '{print $6}'`

THEDATE="${DATE1}${DATE2}${DATE3}"

########################### CONFIGURATION START ##################################

KEEPORIG=6			# how many backups to keep in original dir?
KEEPSECOND=30			# how many backups to keep in second dir?

KEEPSQLORIG=15			# how many MySQL dumps to keep in original dir?
KEEPSQLSECOND=50		# how many MySQL dumps to keep in second dir?

ORIGDIR="/root/Backups/apache"	# original directory to put backups
SECONDDIR="/secondplace/"	# secondary directory to copy backups
APACHEDIR="/var/www/html"	# apache docroot
VHOSTSDIR="/var/www/vhosts"	# apache virtual hosts directory

MYSQLUSER=root			# MySQL user for dump
MYSQLPASS=password		# MySQL password for dump

########################### CONFIGURATION DONE ###################################

cd ${ORIGDIR} # chdir to the right dir
tar -cjvf "./Webdev_${THEDATE}.tar.bz2" ${APACHEDIR} # tar up apache dir
tar -cjvf "./Vhosts_${THEDATE}.tar.bz2" ${VHOSTSDIR} # tar up vhosts dir

mysqldump -u ${MYSQLUSER} -p${MYSQLPASS} -A > "./MySQL_${THEDATE}.sql" # dump db
bzip2 "./MySQL_${THEDATE}.sql" # compress db

cp -v "./Webdev_${THEDATE}.tar.bz2" ${SECONDDIR} # copy
cp -v "./Vhosts_${THEDATE}.tar.bz2" ${SECONDDIR} # copy
cp -v "./MySQL_${THEDATE}.sql.bz2" ${SECONDDIR} # copy

# prune .tar.bz2 in original folder
if [ `ls -1 "${ORIGDIR}" | grep .tar.bz2 | wc -l` -gt $KEEPORIG ]; then
   i=1
   for each in `ls -1t "${ORIGDIR}" | grep .tar.bz2`; do
       if [ $i -gt $KEEPORIG ]; then
           echo Removing "${ORIGDIR}/${each}"
           rm -fv -- "${ORIGDIR}/${each}"
       fi
       let "i = i + 1"
   done
fi

# prune .tar.bz2 in second folder
if [ `ls -1 ${SECONDDIR} | grep .tar.bz2 | wc -l` -gt $KEEPSECOND ]; then
   i=1
   for each in `ls -1t "${SECONDDIR}"`; do
       if [ $i -gt $KEEPSECOND ]; then
           echo Removing "${SECONDDIR}/${each}"
           rm -fv -- "${SECONDDIR}/${each}"
       fi
       let "i = i + 1"
   done
fi

# prune db dumps in original folder
if [ `ls -1 "${ORIGDIR}" | grep .sql.bz2 | wc -l` -gt $KEEPSQLORIG ]; then
   i=1
   for each in `ls -1t "${ORIGDIR}" | grep .sql.bz2`; do
       if [ $i -gt $KEEPSQLORIG ]; then
           echo Removing "${ORIGDIR}/${each}"
           rm -fv -- "${ORIGDIR}/${each}"
       fi
       let "i = i + 1"
   done
fi

# prune db dumps in second folder
if [ `ls -1 "${SECONDDIR}" | grep .sql.bz2 | wc -l` -gt $KEEPSQLSECOND ]; then
   i=1
   for each in `ls -1t "${SECONDDIR}" | grep .sql.bz2`; do
       if [ $i -gt $KEEPSQLSECOND ]; then
           echo Removing "${SECONDDIR}/${each}"
           rm -fv -- "${SECONDDIR}/${each}"
       fi
       let "i = i + 1"
   done
fi

You can also download it here, I don’t know how reliable the copy/paste will be.

Taking Ajax further with PHP

Peter's WebDev Workshop

Find this tutorial useful?


First of all, I have to apologise. It’s been literally two months since my last post in this series, and it’s been more than that since I last looked at Ajax in PHP. OK, I might admit it, it was this comment that motivated me to pick up this series again. Oh, that and I’m now on the half term break, so I’m finally getting round to some things that have been on the back burner for a long time.

In our last Ajax tutorial, we got started with Ajax using PHP and made our first Ajax application.

Today, we’re going to take Ajax a little further, by building a little application where our user selects a product from a pop-up list, and then we do a little Ajax dance to get some product details (and an image) and display them in a box below. We’ll be making our own little XML schema which we’ll use to pass information between the JavaScript in the user’s browser and our PHP script on the server.

» Read the rest of this post…

WPGet 0.7 Developer Preview 1

I’ve just released WPGet 0.7 Developer Preview 1. I’ve just taken the code in its current state and put it out here, so anyone interested can give the new features a try. In fact, it should in theory be fairly usable on a production site, but don’t trust me on that – I can’t guarantee it will work.

Here’s the changelog of things that are supposed to make it to the final release:

  • New support for WordPress author – you can see who published which post in WPGet’s output
  • Category support is now fully working, cleaned up massively and is now out of beta
  • Ajax comments system – have your comments available with one click from outside the actual WordPress page
  • Line breaks in WordPress posts are now honoured in WPGet’s output
  • Single post – output only one, static post from outside WordPress (but keeping it up-to-date with WP’s copy)
  • New query wrapper function for more centralisation
  • WPGet will surpress PHP’s errors if a query fails, and display its own (friendlier) message and email detailed error reports if that’s enabled
  • Style support – includes a new style engine making it easier to integrate WPGet with your site’s individual style
  • General speed enhancements and code cleanup
  • Brand new WPGet Installer (née Config Tool)

Not everything there is done in this copy, though, that’s just a list of stuff that will be confirmed to work by the time it goes final. The main thing missing from a feature perspective is styles (the ability is there but there are no styles yet) and not all the query infrastructure is updated to the new wrapper function. Oh, and it’s all not tested (not yet even tried with PHP 4 yet, so be warned).

Still, have a play around and tell me about bugs if you find them. 😀

Download .zip

Download .tar.bz2

Download .tar.gz

FireBug 1.0 rocks

FireBug is an awesome Firefox extension for web developers.

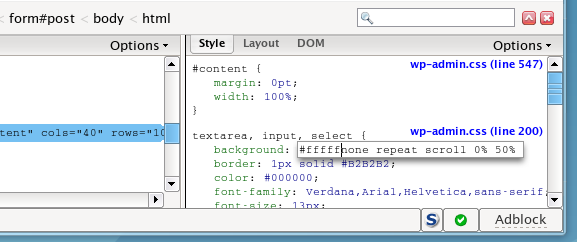
The FireBug developers have just put out a 1.0 release and it includes loads of cool features. There’s one that I just have to share, though, and it is awesome.

If you use inspect to select an element on the page, you can then double-click on bits of the CSS in the right hand pane, and get this, edit them in real time! That means you can literally play around with how a website looks in real time and it’s really useful when you want to make a CSS tweak to something. You just use FireBug to preview it in real time and adjust your edits to make it just right, then you can tweak the actual file. No page reloading needed (or worse Ctrl-F5 to clear the cache).

FireBug screenshot

Download and install it from the official Mozilla add-ons page.

WordPress 2.1 released

WordPress 2.1 has been released – w00t!

I haven’t upgraded just yet, I’m going to do a bit of testing with WP 2.1 to make sure nothing breaks on my personal mirrored copy of the site first, and do a couple of other things too, but I will be upgrading to WordPress 2.1 in the very near future.

WPGet 0.6 is not guaranteed to work with WordPress 2.1 – I have not tried it and I won’t provide support for it, so your mileage may vary. The next version of WPGet, 0.7, which is currently in development, will have WordPress 2.0.x and 2.1 support and I will be answering support questions for both versions of WordPress on that. The release isn’t too far away either, it’s just getting the styles done and testing it.

WPGet 0.7 is taking shape quite nicely

Yep, yet more WPGet news. 😛

Most of the major features for 0.7 are now feature-complete, meaning that after a bit of cleaning up and just checking everything over before (internal) testing can begin.

Also, in parallel, I’ve been hacking away at the brand new, reworked WPGet Installer (née Config Tool). It’s going to be a much nicer and cleaner interface and not to break as many UI conventions. Plus, of course it will have the ability to graphically set up and use all the new brilliant advanced features.

So, here are some screenshots of what the new Installer looks like!

WPGet Installer SplashWPGet Installer Splash Hosted on Zooomr
WPGet Installer Step 1WPGet Installer Step 1 Hosted on Zooomr
WPGet Installer Step 2WPGet Installer Step 2 Hosted on Zooomr

It’s still a way off, but it’s getting along very nicely.