Skip to content

Blog

Reminding myself which machine I am authenticating to with a sudo “lecture”

I frequently SSH into various systems from my primary Linux machine. There is an analogous issue to “too many browser tabs” that exists here — having too many SSH sessions open in different terminal tabs!

There is a risk in these cases of accidentally typing a higher-privileged sudo password into a lower security system by typing into the wrong terminal. There are various approaches that can help here; I have used screen banners with different colours before.

A good “last line of defence” approach to this risk that I have settled on is to make use of sudo‘s “lectures”. You will have seen the default:

We trust you have received the usual lecture from the local System Administrator. It usually boils down to these three things:
#1) Respect the privacy of others.
#2) Think before you type.
#3) With great power comes great responsibility.

We can customise this, and also set it to always show, rather than just the first time you ever use sudo on that machine. We’ll create a custom lecture file with our desired text — in my case, the hostname I’m logged into, so I’m sure where I am before I type the password!

Then, use visudo to set these options:

Defaults lecture=always
Defaults lecture_file=/etc/custom_sudo_lecture

QuickArchiver on Thunderbird — Archiving Messages to the Right Folder with One Click

QuickArchiver icon

Even despite the dominance of webmail, I have long used a traditional desktop email client. I like having a local mail archive should “the cloud” have trouble, as well as the ability to exert control over the user interface and user experience. (That might be partly a euphemism for not having to see ads!)

Apple’s Mail.app built into macOS (going to have to get used to not calling it OS X!) has served me pretty well for quite some time now, alongside Thunderbird when I’m on Linux, and while Mail.app offered the most smooth interface for the platform, it didn’t always have all the features I wanted.

For example, being able to run mail rules is more limited than I wanted in Mail.app. I could have rules run automatically as messages arrived in my inbox, or disable them entirely. But actually how I wanted to use rules was to be able to cast my eye over my inbox, and then bulk archive (to a specific folder) all emails of a certain type if I’d decided none needed my fuller attention.

Recently, I moved to Thunderbird on my Mac for managing email and discovered QuickArchiver.

As well as letting you writing rules yourself, QuickArchiver offers the clever feature of learning which emails go where, and then suggesting the right folder to which that message can be archived with a single click.

It’s still early days, but I am enjoying this. Without spending time writing rules, I’m managing email as before, and QuickArchiver is learning in the background what rules should be offered. The extra column I’ve added to my Inbox is now starting to populate with that one-click link to archive the message to the correct folder!

It’s just a nice little add-on if, like me, you (still??) like to operate in this way with your email.

Upgrading to MariaDB 5.5 on CentOS 6

Installing PHP 5.5 on CentOS 6 using IUS Repositories

I have been inspired once again to fire up my screencasting rig, to show you how to install PHP 5.5 on CentOS 6 using Rackspace’s IUS Community Repositories.

More and more web applications now are likely to require versions of PHP beyond 5.3. CentOS 6 users are stuck with 5.3, with backported security updates, unless they diverge from standard repositories or compile PHP themselves! Until CentOS 7 is with us, those of us trying to run a rock-solid web server on CentOS will be left out in the cold running recent web applications like Moodle 2.7 which require a newer PHP.

In this video, I show you how to use the IUS repositories to get PHP 5.5 running. These repositories, with their Rackspace backing, seem likely to be nice and stable going forward.

As always, I’d love any feedback you might have.

How to install Cacti on CentOS 6

It has been far too long since a video tutorial made its debut here, so I would like to introduce a new tutorial!

Cacti is a great graphing and monitoring tool, but I have struggled in the past with getting it installed, and getting it to do what I want. It can be a little bit complex and fiddly, but recently I have had more success and am putting it to good use measuring and graphing more things.

In this tutorial, I will walk you through installing Cacti on a basic CentOS 6 system with Apache, PHP and MySQL already installed. By the end of the video, it is collecting information for the default graphs in the default installation.

I hope to extend this video series soon with some details about the additional graphs I have recently succeeded at getting installed.

As always, your comments and feedback are appreciated!

Raspberry Pi

Raspberry Pi logo

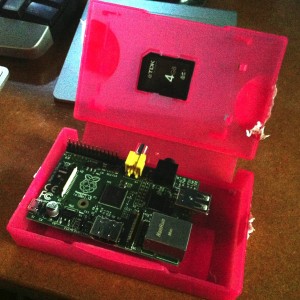
In other 2012 gadget acquisition news, I got my hands on a Raspberry Pi this year, too.

Raspberry Pi in box

Ordered in the summer, and only delivered last month, due to the high demand, it is something I have not yet had an opportunity to play with as much as I would have liked. The advantage of having to wait that long, however, has been a beefier 512 MB version of the device!

In the spirit of my recent iPad mini post, here are some first thoughts on the device:

  • It is amazing how much you can do on such a tiny and inexpensive device. With the Debian wheezy build that is the Pi’s default operating system, you have access to almost the same rich range of software packages on any other Debian system. I was able to install Nginx to serve up web pages at rapid speed, and I am quite sure it would be possible to completely replicate Van Patten Media’s Managed Hosting platform that I have spent much of the year working on, even on such a device!
  • It is unashamedly geeky. This will probably be enough to put off some people who have received a Pi, but perhaps who don᾿t have the support in place to best use it. It isn’t that difficult to get started, but you do need to be able to get the OS onto an SD card. For me, though, I like that opportunity that it gives you.
  • It legitimises the hobbyist again. This pleases me a lot. Many great things were achieved by (originally) hobbyist hackers; re-igniting that spirit has huge potential.

There is some irony in that the Pi is, in a number of ways, the polar opposite of the iPad — it is hobbyist rather than consumerist. The Pi gives you complete control but requires some fiddling, the iPad gives you little control but is so intuitive.

I leave this year much more satisfied about the state of computing because of these two devices.

Why? There is now opportunity for both consumer hardware, and hobbyist hardware, to co-exist and complement each other.

Three Years of Self-Hosting

Three years ago, I made the slightly crazy decision to run this website from my own server. This page is brought to you by a four-year-old generic PC that sits under my desk and dutifully hands out the web pages of my site to anyone from anywhere on the internet that asks for them.

Over the last three years, running my own server has taught me a lot. It has given me complete freedom and control, as well as complete responsibility over my own website. The hardware, software and configuration are all my own thing — if I get it wrong, I have to fix it.

» Read the rest of this post…

Three Years of Mac

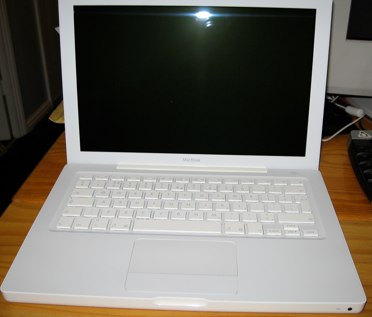
My 13-inch white MacBook on the day it arrived

This month marks three years since I purchased my white MacBook, my first Mac computer. Other than the AppleCare coverage stopping (good job they just replaced my battery, yay!), this represents quite a milestone in my technological life.

I have always had a passion for playing with anything and everything when it comes to technology. I am not satisifed merely to find a technology solution, I am excited and highly motivated to seek out the best solution that meets the specification in the best way and then to understand it and know everything about it.

My interest in the Mac was born from this insatiable desire to understand everything. The Mac was, little over three and a half years ago, much a mystery. Having explored the Windows and Linux worlds extensively, the Mac was the last place in desktop computing that I really hadn’t looked into in great detail.

Over the last three years, I have found that my investment in the Mac has proved worthwhile. Mac OS X has ended up being my primary platform for desktop computing. While I still spend time working in the Windows and Linux worlds and enjoy discovering and learning about the new things happening there, the Mac has been a big focus for me in recent years.

So I ask myself — objectively, why has the Mac become my primary desktop platform?

  • Mac OS X is a Unix operating system. This has a number of advantages, but it mainly means rock-solid reliability (in theory at least) and a decent way to interact with the machine via the command line.
  • It is elegant and put together with passion and care. Some bits of software, especially third-party driver and hardware support software for other platforms, aren’t. They are hacked together at the last minute and at low budget, just to work. Almost everything that ships with the Mac and a lot of third-party stuff for it is just done in this fundamentally different way of building stuff you would be proud to show off.
  • It ‘just works’. Often dismissed as hyperbole, this marketing phrase more often than not is true on the Mac. There are notable exceptions and a few annoying things that you don’t get with generic PC hardware as well, but most of the time, you plug something in, or switch something on for the first time and it just does what it is supposed to.
  • Generally speaking, you get what you pay for. Apple don’t make cheap computers. But neither do I think they make overpriced ones. You pay a premium price for an Apple computer, but you get a fair return for that price in terms of the quality of the product. Again, it comes back to the point about passion — Apple will not ship something that they are not entirely happy with, so what you get is something that meets their high standards.

Having said all that, I am still very interested in using everything and anything. While the Mac may be where my primary focus is on the desktop for now and the forseeable future, I am still very much interested in what is going on in the Linux desktop and Windows worlds and you can be sure I’ll continue playing with all sorts of technology in the future.

Here’s to the next three years of Mac — and perhaps beyond!

Fix ‘Blank Window’ Problem in TweetDeck on KDE

If you’re running the excellent Short-Form “Bird” Social Media Site Before It Went Terrible client TweetDeck on Linux, specifically with the KDE desktop (here version 4.1.1), you may run into a problem where when you start the program, the TweetDeck window is just blank. The buttons at the top and bottom appear, but there is nothing in the window.

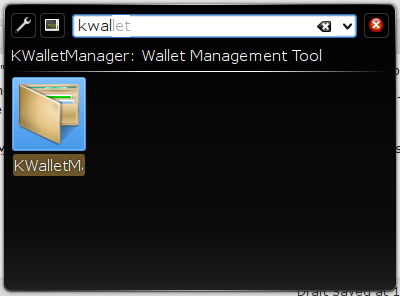
To solve this problem, first launch the application KWalletManager by pressing Alt-F2 and typing in kwallet. It should be the first result, so press Enter to start the application.

KWalletManager launch

After KWalletManager is running, start TweetDeck again and you everything should work as normal.

HP DeskJet F2180

I got a new printer today. Actually, it’s a printer and scanner and copier, All-in-One sort of device. It is the HP DeskJet F2180, found for £30.

It’s replacing my ageing and rather incompatible Lexmark Z45. The Z45 was bought a very long time ago, back even before I started using Linux. Back then, compatibility with alternative operating systems wasn’t a priority and ever since I have been dogged with issues printing from my own machine.

HP DeskJet F2180

» Read the rest of this post…